

In this tutorial we will be writing a jQuery plugin for creating a shiny knob control. Aptly named knobKnob, this plugin will use CSS3 transformations and jQuery's new event handling methods to give visitors of your website a new way of interactively choosing a value from a range.
https://github.com/martinaglv/KnobKnob
The HTML
The HTML markup for the page is rather straightforward. We are only going to need a placeholder element for the control - the rest is going to be dynamically generated by the plugin. Just in case, here is the complete markup of the page:
index.html
First we include the latest version of jQuery, transform.js which levels cross-browser support of the CSS3 transform properties we will be using, the knobKnob plugin file and script.js, which pulls everything together.
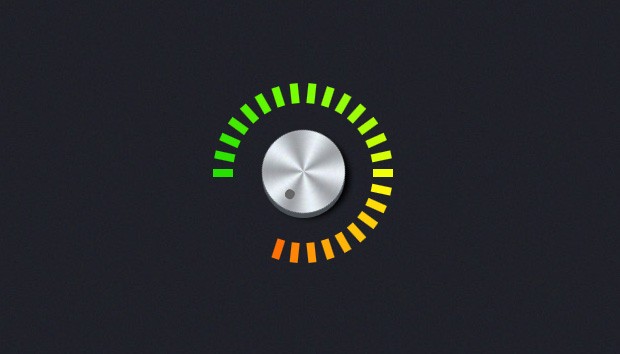
The #control div is where the plugin markup will be generated. Below we will insert divs that will become the colorful bars around it. They are not part of the KnobKnob plugin, we will be showing them depending on the chosen value in the control. KnobKnob also comes with a stylesheet that determines the looks of the knob. You can see it included in the head section.
Now lets write this plugin!
The jQuery Code
You can find the plugin source files in the knobKnob folder. To use it in your project simply unzip it in your website's assets folder and include the files you find inside. Here is the actual plugin file:
assets/knobKnob/knobKnob.jquery.js
The plugin takes a number of options as a parameter object - snap, value and turn:
snap is a number of degrees that are snapped to zero. You can test this by slowly turning the knob down;
value is the initial rotation of the knob (also in degrees);
turn is a callback function that is called every time the knob is turned. Its only argument is a ratio (from 0 to 1) of the rotation. We will use this function in a moment to determine how many of the colorful dividers to show.
In the code above you can see that we are using the Math.atan2 function (as we did in the PointPoint plugin) to calculate the angle (in radians) between the mouse pointer and the center of the knob. By keeping track of the angle in the start and end position of the drag, we can determine how much to rotate the knob.
Later we are also using jQuery 1.7's new methods for manipulating event listeners - on and off.
Now lets see how we can use this plugin.
assets/js/script.js
The colorful bars that are displayed around the knob are not part of the plugin. And they shouldn't be - the plugin only handles the control itself which makes it easier to reuse it.
The code above creates a set of 30 divs with colors gradually going from green to red. These are then rotated by 12 degree increments. Thanks to the turn callback function passed to the plugin, this code can determine how many of the colorful bars to show. You can see the rest of the bar styling in assets/css/styles.css.
With this our plugin is complete! You can use it as part of control panels and other administrative pages, everywhere you want to give users the ability to choose from a pool of values.
https://github.com/martinaglv/KnobKnob
The HTML
The HTML markup for the page is rather straightforward. We are only going to need a placeholder element for the control - the rest is going to be dynamically generated by the plugin. Just in case, here is the complete markup of the page:
index.html
Kod:
<!DOCTYPE html>
<html>
    <head>
        <**** charset="utf-8" />
        <title>Shiny Switches with CSS3 & jQuery | Tutorialzine Demo</title>

        <!-- CSS stylesheets -->
        <link rel="stylesheet" href="assets/css/styles.css" />
        <link rel="stylesheet" href="assets/knobKnob/knobKnob.css" />

        <!--[if lt IE 9]>
          <script src="http://html5shiv.googlecode.com/svn/trunk/html5.js"></script>
        <![endif]-->
    </head>

    <body>

        <section id="main">

            <div id="bars">
                <div id="control">
                    <!-- The knob markup will go here -->
                </div>
                                <!-- The colorful dividers will go here -->
            </div>

        </section>

        <!-- JavaScript includes -->
        <script src="http://code.jquery.com/jquery-1.7.1.min.js"></script>
        <script src="assets/knobKnob/transform.js"></script>
        <script src="assets/knobKnob/knobKnob.jquery.js"></script>
        <script src="assets/js/script.js"></script>

    </body>
</html>The #control div is where the plugin markup will be generated. Below we will insert divs that will become the colorful bars around it. They are not part of the KnobKnob plugin, we will be showing them depending on the chosen value in the control. KnobKnob also comes with a stylesheet that determines the looks of the knob. You can see it included in the head section.
Now lets write this plugin!
The jQuery Code
You can find the plugin source files in the knobKnob folder. To use it in your project simply unzip it in your website's assets folder and include the files you find inside. Here is the actual plugin file:
assets/knobKnob/knobKnob.jquery.js
Kod:
/**
 * [USER=71471]name[/USER]        jQuery KnobKnob plugin
 * [USER=585213]author[/USER]      Martin Angelov
 * [USER=423072]version[/USER]     1.0
 * @url         [url]https://tutorialzine.com/2011/11/pretty-switches-css3-jquery/[/url]
 * @license     MIT License
 */

(function($){

    $.fn.knobKnob = function(props){

        var options = $.extend({
            snap: 0,
            value: 0,
            turn: function(){}
        }, props || {});

        var tpl = '<div class="knob">\
                <div class="top"></div>\
                <div class="base"></div>\
            </div>';

        return this.each(function(){

            var el = $(this);
            el.append(tpl);

            var knob = $('.knob',el)
                knobTop = knob.find('.top'),
                startDeg = -1,
                currentDeg = 0,
                rotation = 0,
                lastDeg = 0,
                doc = $(********);

            if(options.value > 0 && options.value <= 359){
                rotation = currentDeg = options.value;
                knobTop.css('transform','rotate('+(currentDeg)+'deg)');
                options.turn(currentDeg/359);
            }

            knob.on('mousedown', function(e){

                e.preventDefault();

                var offset = knob.offset();
                var center = {
                    y : offset.top + knob.height()/2,
                    x: offset.left + knob.width()/2
                };

                var a, b, deg, tmp,
                    rad2deg = 180/Math.PI;

                knob.on('mousemove.rem',function(e){

                    a = center.y - e.pageY;
                    b = center.x - e.pageX;
                    deg = Math.atan2(a,b)*rad2deg;

                    // we have to make sure that negative
                    // angles are turned into positive:
                    if(deg<0){
                        deg = 360 + deg;
                    }

                    // Save the starting position of the drag
                    if(startDeg == -1){
                        startDeg = deg;
                    }

                    // Calculating the current rotation
                    tmp = Math.floor((deg-startDeg) + rotation);

                    // Making sure the current rotation
                    // stays between 0 and 359
                    if(tmp < 0){
                        tmp = 360 + tmp;
                    }
                    else if(tmp > 359){
                        tmp = tmp % 360;
                    }

                    // Snapping in the off position:
                    if(options.snap && tmp < options.snap){
                        tmp = 0;
                    }

                    // This would suggest we are at an end position;
                    // we need to block further rotation.
                    if(Math.abs(tmp - lastDeg) > 180){
                        return false;
                    }

                    currentDeg = tmp;
                    lastDeg = tmp;

                    knobTop.css('transform','rotate('+(currentDeg)+'deg)');
                    options.turn(currentDeg/359);
                });

                doc.on('mouseup.rem',function(){
                    knob.off('.rem');
                    doc.off('.rem');

                    // Saving the current rotation
                    rotation = currentDeg;

                    // Marking the starting degree as invalid
                    startDeg = -1;
                });

            });
        });
    };

})(jQuery);
The plugin takes a number of options as a parameter object - snap, value and turn:
snap is a number of degrees that are snapped to zero. You can test this by slowly turning the knob down;
value is the initial rotation of the knob (also in degrees);
turn is a callback function that is called every time the knob is turned. Its only argument is a ratio (from 0 to 1) of the rotation. We will use this function in a moment to determine how many of the colorful dividers to show.
In the code above you can see that we are using the Math.atan2 function (as we did in the PointPoint plugin) to calculate the angle (in radians) between the mouse pointer and the center of the knob. By keeping track of the angle in the start and end position of the drag, we can determine how much to rotate the knob.
Later we are also using jQuery 1.7's new methods for manipulating event listeners - on and off.
Now lets see how we can use this plugin.
assets/js/script.js
Kod:
$(function(){

    var colors = [
        '26e000','2fe300','37e700','45ea00','51ef00',
        '61f800','6bfb00','77ff02','80ff05','8cff09',
        '93ff0b','9eff09','a9ff07','c2ff03','d7ff07',
        'f2ff0a','fff30a','ffdc09','ffce0a','ffc30a',
        'ffb509','ffa808','ff9908','ff8607','ff7005',
        'ff5f04','ff4f03','f83a00','ee2b00','e52000'
    ];

    var rad2deg = 180/Math.PI;
    var deg = 0;
    var bars = $('#bars');

    for(var i=0;i<colors.length;i++){

        deg = i*12;

        // Create the colorbars

        $('<div class="colorBar">').css({
            backgroundColor: '#'+colors[i],
            transform:'rotate('+deg+'deg)',
            top: -Math.sin(deg/rad2deg)*80+100,
            left: Math.cos((180 - deg)/rad2deg)*80+100,
        }).appendTo(bars);
    }

    var colorBars = bars.find('.colorBar');
    var numBars = 0, lastNum = -1;

    $('#control').knobKnob({
        snap : 10,
        value: 154,
        turn : function(ratio){
            numBars = Math.round(colorBars.length*ratio);

            // Update the dom only when the number of active bars
            // changes, instead of on every move

            if(numBars == lastNum){
                return false;
            }
            lastNum = numBars;

            colorBars.removeClass('active').slice(0, numBars).addClass('active');
        }
    });

});
The colorful bars that are displayed around the knob are not part of the plugin. And they shouldn't be - the plugin only handles the control itself which makes it easier to reuse it.
The code above creates a set of 30 divs with colors gradually going from green to red. These are then rotated by 12 degree increments. Thanks to the turn callback function passed to the plugin, this code can determine how many of the colorful bars to show. You can see the rest of the bar styling in assets/css/styles.css.
With this our plugin is complete! You can use it as part of control panels and other administrative pages, everywhere you want to give users the ability to choose from a pool of values.

