

Greetings Dear Turk Hack Team Members, in this tutorial you'll learn python socket module,
Sockets and the socket API are used to send messages across a network. They provide a form of inter-process communication (IPC). The network can be a logical, local network to the computer, or one thats physically connected to an external network, with its own connections to other networks. The obvious example is the Internet, which you connect to via your ISP.
This tutorial has three different iterations of building a socket server and client with Python:
Well start the tutorial by looking at a simple socket server and client.
Once youve seen the API and how things work in this initial example, well look at an improved version that handles multiple connections simultaneously.
Finally, well progress to building an example server and client that functions like a full-fledged socket application, complete with its own custom header and content.
By the end of this tutorial, youll understand how to use the main functions and methods in Pythons socket module to write your own client-server applications. This includes showing you how to use a custom class to send messages and data between endpoints that you can build upon and utilize for your own applications.
The examples in this tutorial use Python 3.6. You can find the source code on GitHub.
Networking and sockets are large subjects. Literal volumes have been written about them. If youre new to sockets or networking, its completely normal if you feel overwhelmed with all of the terms and pieces. I know I did!
Dont be discouraged though. Ive written this tutorial for you. As we do with Python, we can learn a little bit at a time. Use your browsers bookmark feature and come back when youre ready for the next section.
Lets get started!
Background
Sockets have a long history. Their use originated with ARPANET in 1971 and later became an API in the Berkeley Software Distribution (BSD) operating system released in 1983 called Berkeley sockets.
When the Internet took off in the 1990s with the World Wide Web, so did network programming. Web servers and browsers werent the only applications taking advantage of newly connected networks and using sockets. Client-server applications of all types and sizes came into widespread use.
Today, although the underlying protocols used by the socket API have evolved over the years, and weve seen new ones, the low-level API has remained the same.
The most common type of socket applications are client-server applications, where one side acts as the server and waits for connections from clients. This is the type of application that Ill be covering in this tutorial. More specifically, well look at the socket API for Internet sockets, sometimes called Berkeley or BSD sockets. There are also Unix domain sockets, which can only be used to communicate between processes on the same host.
Socket API Overview
Pythons socket module provides an interface to the Berkeley sockets API. This is the module that well use and discuss in this tutorial.
The primary socket API functions and methods in this module are:
socket()
bind()
listen()
accept()
connect()
connect_ex()
send()
recv()
close()
Python provides a convenient and consistent API that maps directly to these system calls, their C counterparts. Well look at how these are used together in the next section.
As part of its standard library, Python also has classes that make using these low-level socket functions easier. Although its not covered in this tutorial, see the socketserver module, a framework for network servers. There are also many modules available that implement higher-level Internet protocols like HTTP and SMTP. For an overview, see Internet Protocols and Support.
TCP Sockets
As youll see shortly, well create a socket object using socket.socket() and specify the socket type as socket.SOCK_STREAM. When you do that, the default protocol thats used is the Transmission Control Protocol (TCP). This is a good default and probably what you want.
Why should you use TCP? The Transmission Control Protocol (TCP):
Is reliable: packets dropped in the network are detected and retransmitted by the sender.
Has in-order data delivery: data is read by your application in the order it was written by the sender.
In contrast, User Datagram Protocol (UDP) sockets created with socket.SOCK_DGRAM arent reliable, and data read by the receiver can be out-of-order from the senders writes.
Why is this important? Networks are a best-effort delivery system. Theres no guarantee that your data will reach its destination or that youll receive whats been sent to you.
Network devices (for example, routers and switches), have finite bandwidth available and their own inherent system limitations. They have CPUs, memory, buses, and interface packet buffers, just like our clients and servers. TCP relieves you from having to worry about packet loss, data arriving out-of-order, and many other things that invariably happen when youre communicating across a network.
In the diagram below, lets look at the sequence of socket API calls and data flow for TCP:
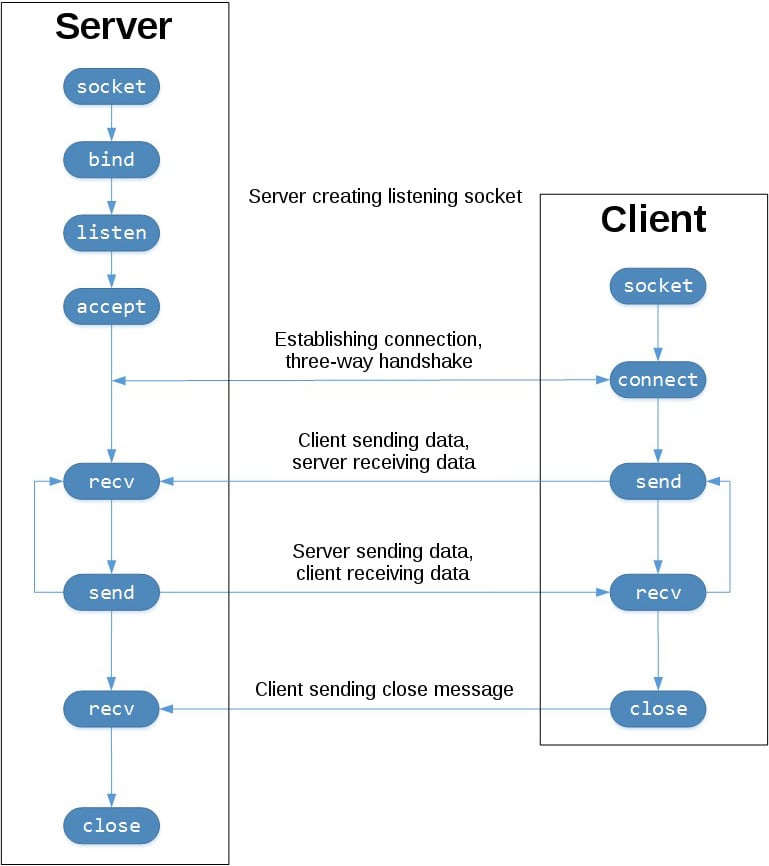
The left-hand column represents the server. On the right-hand side is the client.
Starting in the top left-hand column, note the API calls the server makes to setup a listening socket:
socket()
bind()
listen()
accept()
A listening socket does just what it sounds like. It listens for connections from clients. When a client connects, the server calls accept() to accept, or complete, the connection.
The client calls connect() to establish a connection to the server and initiate the three-way handshake. The handshake step is important since it ensures that each side of the connection is reachable in the network, in other words that the client can reach the server and vice-versa. It may be that only one host, client or server, can reach the other.
In the middle is the round-trip section, where data is exchanged between the client and server using calls to send() and recv().
At the bottom, the client and server close() their respective sockets.
Echo Client and Server
Now that youve seen an overview of the socket API and how the client and server communicate, lets create our first client and server. Well begin with a simple implementation. The server will simply echo whatever it receives back to the client.
Echo Server
Heres the server, echo-server.py:
Note: Dont worry about understanding everything above right now. Theres a lot going on in these few lines of code. This is just a starting point so you can see a basic server in action.
Lets walk through each API call and see whats happening.
socket.socket() creates a socket object that supports the context manager type, so you can use it in a with statement. Theres no need to call s.close():
The arguments passed to socket() specify the address family and socket type. AF_INET is the Internet address family for IPv4. SOCK_STREAM is the socket type for TCP, the protocol that will be used to transport our messages in the network.
bind() is used to associate the socket with a specific network interface and port number:
The values passed to bind() depend on the address family of the socket. In this example, were using socket.AF_INET (IPv4). So it expects a 2-tuple: (host, port).
host can be a hostname, IP address, or empty string. If an IP address is used, host should be an IPv4-formatted address string. The IP address 127.0.0.1 is the standard IPv4 address for the loopback interface, so only processes on the host will be able to connect to the server. If you pass an empty string, the server will accept connections on all available IPv4 interfaces.
port should be an integer from 1-65535 (0 is reserved). Its the TCP port number to accept connections on from clients. Some systems may require superuser privileges if the port is < 1024.
Heres a note on using hostnames with bind():
Ill discuss this more later in Using Hostnames, but its worth mentioning here. For now, just understand that when using a hostname, you could see different results depending on whats returned from the name resolution process.
It could be anything. The first time you run your application, it might be the address 10.1.2.3. The next time its a different address, 192.168.0.1. The third time, it could be 172.16.7.8, and so on.
Continuing with the server example, listen() enables a server to accept() connections. It makes it a listening socket:
listen() has a backlog parameter. It specifies the number of unaccepted connections that the system will allow before refusing new connections. Starting in Python 3.5, its optional. If not specified, a default backlog value is chosen.
If your server receives a lot of connection requests simultaneously, increasing the backlog value may help by setting the maximum length of the queue for pending connections. The maximum value is system dependent. For example, on Linux, see /proc/sys/net/core/somaxconn.
accept() blocks and waits for an incoming connection. When a client connects, it returns a new socket object representing the connection and a tuple holding the address of the client. The tuple will contain (host, port) for IPv4 connections or (host, port, flowinfo, scopeid) for IPv6. See Socket Address Families in the reference section for details on the tuple values.
One thing thats imperative to understand is that we now have a new socket object from accept(). This is important since its the socket that youll use to communicate with the client. Its distinct from the listening socket that the server is using to accept new connections:
After getting the client socket object conn from accept(), an infinite while loop is used to loop over blocking calls to conn.recv(). This reads whatever data the client sends and echoes it back using conn.sendall().
If conn.recv() returns an empty bytes object, b'', then the client closed the connection and the loop is terminated. The with statement is used with conn to automatically close the socket at the end of the block.
Echo Client
Now lets look at the client, echo-client.py:
In comparison to the server, the client is pretty simple. It creates a socket object, connects to the server and calls s.sendall() to send its message. Lastly, it calls s.recv() to read the servers reply and then prints it.
Running the Echo Client and Server
Lets run the client and server to see how they behave and inspect whats happening.
Note: If youre having trouble getting the examples or your own code to run from the command line, read How Do I Make My Own Command-Line Commands Using Python? If youre on Windows, check the Python Windows FAQ.
Open a terminal or command prompt, navigate to the directory that contains your scripts, and run the server:
Your terminal will appear to hang. Thats because the server is blocked (suspended) in a call:
Its waiting for a client connection. Now open another terminal window or command prompt and run the client:
In the server window, you should see:
In the output above, the server printed the addr tuple returned from s.accept(). This is the clients IP address and TCP port number. The port number, 64623, will most likely be different when you run it on your machine.
Second part is coming soon //Quoted
Sockets and the socket API are used to send messages across a network. They provide a form of inter-process communication (IPC). The network can be a logical, local network to the computer, or one thats physically connected to an external network, with its own connections to other networks. The obvious example is the Internet, which you connect to via your ISP.
This tutorial has three different iterations of building a socket server and client with Python:
Well start the tutorial by looking at a simple socket server and client.
Once youve seen the API and how things work in this initial example, well look at an improved version that handles multiple connections simultaneously.
Finally, well progress to building an example server and client that functions like a full-fledged socket application, complete with its own custom header and content.
By the end of this tutorial, youll understand how to use the main functions and methods in Pythons socket module to write your own client-server applications. This includes showing you how to use a custom class to send messages and data between endpoints that you can build upon and utilize for your own applications.
The examples in this tutorial use Python 3.6. You can find the source code on GitHub.
Networking and sockets are large subjects. Literal volumes have been written about them. If youre new to sockets or networking, its completely normal if you feel overwhelmed with all of the terms and pieces. I know I did!
Dont be discouraged though. Ive written this tutorial for you. As we do with Python, we can learn a little bit at a time. Use your browsers bookmark feature and come back when youre ready for the next section.
Lets get started!
Background
Sockets have a long history. Their use originated with ARPANET in 1971 and later became an API in the Berkeley Software Distribution (BSD) operating system released in 1983 called Berkeley sockets.
When the Internet took off in the 1990s with the World Wide Web, so did network programming. Web servers and browsers werent the only applications taking advantage of newly connected networks and using sockets. Client-server applications of all types and sizes came into widespread use.
Today, although the underlying protocols used by the socket API have evolved over the years, and weve seen new ones, the low-level API has remained the same.
The most common type of socket applications are client-server applications, where one side acts as the server and waits for connections from clients. This is the type of application that Ill be covering in this tutorial. More specifically, well look at the socket API for Internet sockets, sometimes called Berkeley or BSD sockets. There are also Unix domain sockets, which can only be used to communicate between processes on the same host.
Socket API Overview
Pythons socket module provides an interface to the Berkeley sockets API. This is the module that well use and discuss in this tutorial.
The primary socket API functions and methods in this module are:
socket()
bind()
listen()
accept()
connect()
connect_ex()
send()
recv()
close()
Python provides a convenient and consistent API that maps directly to these system calls, their C counterparts. Well look at how these are used together in the next section.
As part of its standard library, Python also has classes that make using these low-level socket functions easier. Although its not covered in this tutorial, see the socketserver module, a framework for network servers. There are also many modules available that implement higher-level Internet protocols like HTTP and SMTP. For an overview, see Internet Protocols and Support.
TCP Sockets
As youll see shortly, well create a socket object using socket.socket() and specify the socket type as socket.SOCK_STREAM. When you do that, the default protocol thats used is the Transmission Control Protocol (TCP). This is a good default and probably what you want.
Why should you use TCP? The Transmission Control Protocol (TCP):
Is reliable: packets dropped in the network are detected and retransmitted by the sender.
Has in-order data delivery: data is read by your application in the order it was written by the sender.
In contrast, User Datagram Protocol (UDP) sockets created with socket.SOCK_DGRAM arent reliable, and data read by the receiver can be out-of-order from the senders writes.
Why is this important? Networks are a best-effort delivery system. Theres no guarantee that your data will reach its destination or that youll receive whats been sent to you.
Network devices (for example, routers and switches), have finite bandwidth available and their own inherent system limitations. They have CPUs, memory, buses, and interface packet buffers, just like our clients and servers. TCP relieves you from having to worry about packet loss, data arriving out-of-order, and many other things that invariably happen when youre communicating across a network.
In the diagram below, lets look at the sequence of socket API calls and data flow for TCP:
The left-hand column represents the server. On the right-hand side is the client.
Starting in the top left-hand column, note the API calls the server makes to setup a listening socket:
socket()
bind()
listen()
accept()
A listening socket does just what it sounds like. It listens for connections from clients. When a client connects, the server calls accept() to accept, or complete, the connection.
The client calls connect() to establish a connection to the server and initiate the three-way handshake. The handshake step is important since it ensures that each side of the connection is reachable in the network, in other words that the client can reach the server and vice-versa. It may be that only one host, client or server, can reach the other.
In the middle is the round-trip section, where data is exchanged between the client and server using calls to send() and recv().
At the bottom, the client and server close() their respective sockets.
Echo Client and Server
Now that youve seen an overview of the socket API and how the client and server communicate, lets create our first client and server. Well begin with a simple implementation. The server will simply echo whatever it receives back to the client.
Echo Server
Heres the server, echo-server.py:
Kod:
[COLOR="PaleGreen"]#!/usr/bin/env python3

import socket

HOST = '127.0.0.1'  # Standard loopback interface address (localhost)
PORT = 65432        # Port to listen on (non-privileged ports are > 1023)

with socket.socket(socket.AF_INET, socket.SOCK_STREAM) as s:
    s.bind((HOST, PORT))
    s.listen()
    conn, addr = s.accept()
    with conn:
        print('Connected by', addr)
        while True:
            data = conn.recv(1024)
            if not data:
                break
            conn.sendall(data)[/COLOR]
Note: Dont worry about understanding everything above right now. Theres a lot going on in these few lines of code. This is just a starting point so you can see a basic server in action.
Lets walk through each API call and see whats happening.
socket.socket() creates a socket object that supports the context manager type, so you can use it in a with statement. Theres no need to call s.close():
Kod:
[COLOR="PaleGreen"]with socket.socket(socket.AF_INET, socket.SOCK_STREAM) as s:
    pass  # Use the socket object without calling s.close()[/COLOR]
The arguments passed to socket() specify the address family and socket type. AF_INET is the Internet address family for IPv4. SOCK_STREAM is the socket type for TCP, the protocol that will be used to transport our messages in the network.
bind() is used to associate the socket with a specific network interface and port number:
Kod:
[COLOR="palegreen"]HOST = '127.0.0.1'  # Standard loopback interface address (localhost)
PORT = 65432        # Port to listen on (non-privileged ports are > 1023)

# ...

s.bind((HOST, PORT))[/COLOR]
The values passed to bind() depend on the address family of the socket. In this example, were using socket.AF_INET (IPv4). So it expects a 2-tuple: (host, port).
host can be a hostname, IP address, or empty string. If an IP address is used, host should be an IPv4-formatted address string. The IP address 127.0.0.1 is the standard IPv4 address for the loopback interface, so only processes on the host will be able to connect to the server. If you pass an empty string, the server will accept connections on all available IPv4 interfaces.
port should be an integer from 1-65535 (0 is reserved). Its the TCP port number to accept connections on from clients. Some systems may require superuser privileges if the port is < 1024.
Heres a note on using hostnames with bind():
If you use a hostname in the host portion of IPv4/v6 socket address, the program may show a non-deterministic behavior, as Python uses the first address returned from the DNS resolution. The socket address will be resolved differently into an actual IPv4/v6 address, depending on the results from DNS resolution and/or the host configuration. For deterministic behavior use a numeric address in host portion.
Ill discuss this more later in Using Hostnames, but its worth mentioning here. For now, just understand that when using a hostname, you could see different results depending on whats returned from the name resolution process.
It could be anything. The first time you run your application, it might be the address 10.1.2.3. The next time its a different address, 192.168.0.1. The third time, it could be 172.16.7.8, and so on.
Continuing with the server example, listen() enables a server to accept() connections. It makes it a listening socket:
Kod:
[COLOR="palegreen"]s.listen()
conn, addr = s.accept()[/COLOR]
listen() has a backlog parameter. It specifies the number of unaccepted connections that the system will allow before refusing new connections. Starting in Python 3.5, its optional. If not specified, a default backlog value is chosen.
If your server receives a lot of connection requests simultaneously, increasing the backlog value may help by setting the maximum length of the queue for pending connections. The maximum value is system dependent. For example, on Linux, see /proc/sys/net/core/somaxconn.
accept() blocks and waits for an incoming connection. When a client connects, it returns a new socket object representing the connection and a tuple holding the address of the client. The tuple will contain (host, port) for IPv4 connections or (host, port, flowinfo, scopeid) for IPv6. See Socket Address Families in the reference section for details on the tuple values.
One thing thats imperative to understand is that we now have a new socket object from accept(). This is important since its the socket that youll use to communicate with the client. Its distinct from the listening socket that the server is using to accept new connections:
Kod:
[COLOR="palegreen"]conn, addr = s.accept()
with conn:
    print('Connected by', addr)
    while True:
        data = conn.recv(1024)
        if not data:
            break
        conn.sendall(data)[/COLOR]
After getting the client socket object conn from accept(), an infinite while loop is used to loop over blocking calls to conn.recv(). This reads whatever data the client sends and echoes it back using conn.sendall().
If conn.recv() returns an empty bytes object, b'', then the client closed the connection and the loop is terminated. The with statement is used with conn to automatically close the socket at the end of the block.
Echo Client
Now lets look at the client, echo-client.py:
Kod:
[COLOR="PaleGreen"]#!/usr/bin/env python3

import socket

HOST = '127.0.0.1'  # The server's hostname or IP address
PORT = 65432        # The port used by the server

with socket.socket(socket.AF_INET, socket.SOCK_STREAM) as s:
    s.connect((HOST, PORT))
    s.sendall(b'Hello, world')
    data = s.recv(1024)

print('Received', repr(data))[/COLOR]
In comparison to the server, the client is pretty simple. It creates a socket object, connects to the server and calls s.sendall() to send its message. Lastly, it calls s.recv() to read the servers reply and then prints it.
Running the Echo Client and Server
Lets run the client and server to see how they behave and inspect whats happening.
Note: If youre having trouble getting the examples or your own code to run from the command line, read How Do I Make My Own Command-Line Commands Using Python? If youre on Windows, check the Python Windows FAQ.
Open a terminal or command prompt, navigate to the directory that contains your scripts, and run the server:
Kod:
[COLOR="palegreen"]./echo-server.py[/COLOR]Your terminal will appear to hang. Thats because the server is blocked (suspended) in a call:
Kod:
conn, addr = s.accept()Its waiting for a client connection. Now open another terminal window or command prompt and run the client:
Kod:
$ ./echo-client.py
Received b'Hello, world'
In the server window, you should see:
Kod:
$ ./echo-server.py
Connected by ('127.0.0.1', 64623)
In the output above, the server printed the addr tuple returned from s.accept(). This is the clients IP address and TCP port number. The port number, 64623, will most likely be different when you run it on your machine.
Second part is coming soon //Quoted

