

Greetings Dear Turk Hack Team Members, in this tutorial you'll continue to learn python socket module.
Multi-Connection Client
Now lets look at the multi-connection client, multiconn-client.py. Its very similar to the server, but instead of listening for connections, it starts by initiating connections via start_connections():
messages = [b'Message 1 from client.', b'Message 2 from client.']
num_conns is read from the command-line, which is the number of connections to create to the server. Just like the server, each socket is set to non-blocking mode.
connect_ex() is used instead of connect() since connect() would immediately raise a BlockingIOError exception. connect_ex() initially returns an error indicator, errno.EINPROGRESS, instead of raising an exception while the connection is in progress. Once the connection is completed, the socket is ready for reading and writing and is returned as such by select().
After the socket is setup, the data we want stored with the socket is created using the class types.SimpleNamespace. The messages the client will send to the server are copied using list(messages) since each connection will call socket.send() and modify the list. Everything needed to keep track of what the client needs to send, has sent and received, and the total number of bytes in the messages is stored in the object data.
Lets look at service_connection(). Its fundamentally the same as the server:
Theres one important difference. It keeps track of the number of bytes its received from the server so it can close its side of the connection. When the server detects this, it closes its side of the connection too.
Note that by doing this, the server depends on the client being well-behaved: the server expects the client to close its side of the connection when its done sending messages. If the client doesnt close, the server will leave the connection open. In a real application, you may want to guard against this in your server and prevent client connections from accumulating if they dont send a request after a certain amount of time.
Running the Multi-Connection Client and Server
Now lets run multiconn-server.py and multiconn-client.py. They both use command-line arguments. You can run them without arguments to see the options.
For the server, pass a host and port number:
For the client, also pass the number of connections to create to the server, num_connections:
Below is the server output when listening on the loopback interface on port 65432:
Below is the client output when it creates two connections to the server above:
Application Client and Server
The multi-connection client and server example is definitely an improvement compared with where we started. However, lets take one more step and address the shortcomings of the previous multiconn example in a final implementation: the application client and server.
We want a client and server that handles errors appropriately so other connections arent affected. Obviously, our client or server shouldnt come crashing down in a ball of fury if an exception isnt caught. This is something we havent discussed up until now. Ive intentionally left out error handling for brevity and clarity in the examples.
Now that youre familiar with the basic API, non-blocking sockets, and select(), we can add some error handling and discuss the elephant in the room that Ive kept hidden from you behind that large curtain over there. Yes, Im talking about the custom class I mentioned way back in the introduction. I knew you wouldnt forget.
First, lets address the errors:
We need to catch OSError. Another thing I havent mentioned in relation to errors is timeouts. Youll see them discussed in many places in the docü****tion. Timeouts happen and are a normal error. Hosts and routers are rebooted, switch ports go bad, cables go bad, cables get unplugged, you name it. You should be prepared for these and other errors and handle them in your code.
What about the elephant in the room? As hinted by the socket type socket.SOCK_STREAM, when using TCP, youre reading from a continuous stream of bytes. Its like reading from a file on disk, but instead youre reading bytes from the network.
However, unlike reading a file, theres no f.seek(). In other words, you cant reposition the socket pointer, if there was one, and move randomly around the data reading whatever, whenever youd like.
When bytes arrive at your socket, there are network buffers involved. Once youve read them, they need to be saved somewhere. Calling recv() again reads the next stream of bytes available from the socket.
What this means is that youll be reading from the socket in chunks. You need to call recv() and save the data in a buffer until youve read enough bytes to have a complete message that makes sense to your application.
Its up to you to define and keep track of where the message boundaries are. As far as the TCP socket is concerned, its just sending and receiving raw bytes to and from the network. It knows nothing about what those raw bytes mean.
This bring us to defining an application-layer protocol. Whats an application-layer protocol? Put simply, your application will send and receive messages. These messages are your applications protocol.
In other words, the length and format you choose for these messages define the semantics and behavior of your application. This is directly related to what I explained in the previous paragraph regarding reading bytes from the socket. When youre reading bytes with recv(), you need to keep up with how many bytes were read and figure out where the message boundaries are.
How is this done? One way is to always send fixed-length messages. If theyre always the same size, then its easy. When youve read that number of bytes into a buffer, then you know you have one complete message.
However, using fixed-length messages is inefficient for small messages where youd need to use padding to fill them out. Also, youre still left with the problem of what to do about data that doesnt fit into one message.
In this tutorial, well take a generic approach. An approach thats used by many protocols, including HTTP. Well prefix messages with a header that includes the content length as well as any other fields we need. By doing this, well only need to keep up with the header. Once weve read the header, we can process it to determine the length of the messages content and then read that number of bytes to consume it.
Well implement this by creating a custom class that can send and receive messages that contain text or binary data. You can improve and extend it for your own applications. The most important thing is that youll be able to see an example of how this is done.
I need to mention something regarding sockets and bytes that may affect you. As we talked about earlier, when sending and receiving data via sockets, youre sending and receiving raw bytes.
If you receive data and want to use it in a context where its interpreted as multiple bytes, for example a 4-byte integer, youll need to take into account that it could be in a format thats not native to your machines CPU. The client or server on the other end could have a CPU that uses a different byte order than your own. If this is the case, youll need to convert it to your hosts native byte order before using it.
This byte order is referred to as a CPUs endianness. See Byte Endianness in the reference section for details. Well avoıd this issue by taking advantage of Unicode for our message header and using the encoding UTF-8. Since UTF-8 uses an 8-bit encoding, there are no byte ordering issues.
You can find an explanation in Pythons Encodings and Unicode documéntation. Note that this applies to the text header only. Well use an explicit type and encoding defined in the header for the content thats being sent, the message payload. This will allow us to transfer any data wed like (text or binary), in any format.
You can easily determine the byte order of your machine by using sys.byteorder. For example, on my Intel laptop, this happens:
If I run this in a virtual machine that emulates a big-endian CPU (PowerPC), then this happens:
In this example application, our application-layer protocol defines the header as Unicode text with a UTF-8 encoding. For the actual content in the message, the message payload, youll still have to swap the byte order manually if needed.
This will depend on your application and whether or not it needs to process multi-byte binary data from a machine with a different endianness. You can help your client or server implement binary support by adding additional headers and using them to pass parameters, similar to HTTP.
Dont worry if this doesnt make sense yet. In the next section, youll see how all of this works and fits together.
Application Protocol Header
Lets fully define the protocol header. The protocol header is:
- Variable-length text
- Unicode with the encoding UTF-8
- A Python dictionary serialized using JSON
The required headers, or sub-headers, in the protocol headers dictionary are as follows:
byteorder
The byte order of the machine (uses sys.byteorder). This may not be required for your application.
content-length
The length of the content in bytes.
content-type
The type of content in the payload, for example, text/json or binary/my-binary-type.
content-encoding
The encoding used by the content, for example, utf-8 for Unicode text or binary for binary data.
These headers inform the receiver about the content in the payload of the message. This allows you to send arbitrary data while providing enough information so the content can be decoded and interpreted correctly by the receiver. Since the headers are in a dictionary, its easy to add additional headers by inserting key/value pairs as needed.
Sending an Application Message
Theres still a bit of a problem. We have a variable-length header, which is nice and flexible, but how do you know the length of the header when reading it with recv()?
When we previously talked about using recv() and message boundaries, I mentioned that fixed-length headers can be inefficient. Thats true, but were going to use a small, 2-byte, fixed-length header to prefix the JSON header that contains its length.
You can think of this as a hybrid approach to sending messages. In effect, were bootstrapping the message receive process by sending the length of the header first. This makes it easy for our receiver to deconstruct the message.
To give you a better idea of the message format, lets look at a message in its entirety:
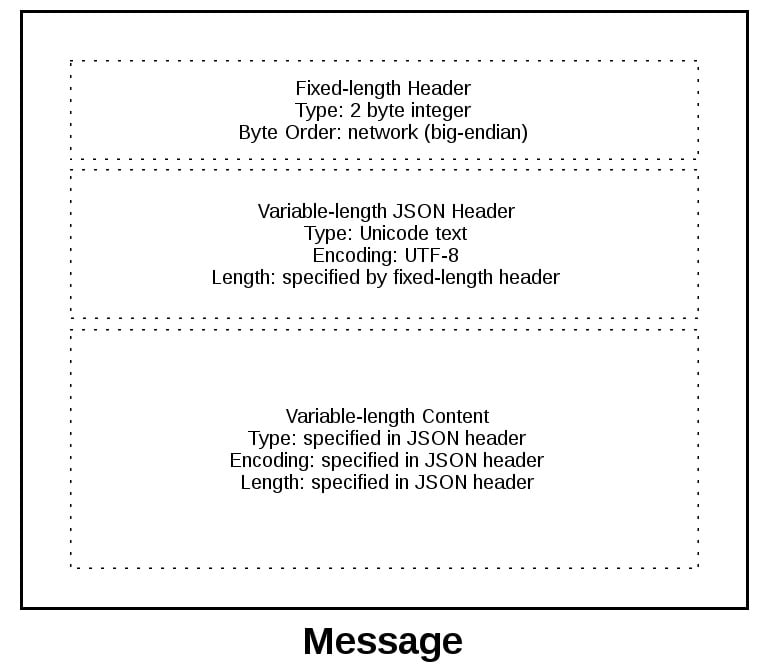
A message starts with a fixed-length header of 2 bytes thats an integer in network byte order. This is the length of the next header, the variable-length JSON header. Once weve read 2 bytes with recv(), then we know we can process the 2 bytes as an integer and then read that number of bytes before decoding the UTF-8 JSON header.
The JSON header contains a dictionary of additional headers. One of those is content-length, which is the number of bytes of the messages content (not including the JSON header). Once weve called recv() and read content-length bytes, weve reached a message boundary and read an entire message.
Application Message Class
Finally, the payoff! Lets look at the Message class and see how its used with select() when read and write events happen on the socket.
For this example application, I had to come up with an idea for what types of messages the client and server would use. Were far beyond toy echo clients and servers at this point.
To keep things simple and still demonstrate how things would work in a real application, I created an application protocol that implements a basic search feature. The client sends a search request and the server does a lookup for a match. If the request sent by the client isnt recognized as a search, the server assumes its a binary request and returns a binary response.
After reading the following sections, running the examples, and experimenting with the code, youll see how things work. You can then use the Message class as a starting point and modify it for your own use.
Were really not that far off from the multiconn client and server example. The event loop code stays the same in app-client.py and app-server.py. What Ive done is move the message code into a class named Message and added methods to support reading, writing, and processing of the headers and content. This is a great example for using a class.
As we discussed before and youll see below, working with sockets involves keeping state. By using a class, we keep all of the state, data, and code bundled together in an organized unit. An instance of the class is created for each socket in the client and server when a connection is started or accepted.
The class is mostly the same for both the client and the server for the wrapper and utility methods. They start with an underscore, like Message._json_encode(). These methods simplify working with the class. They help other methods by allowing them to stay shorter and support the DRY principle.
The servers Message class works in essentially the same way as the clients and vice-versa. The difference being that the client initiates the connection and sends a request message, followed by processing the servers response message. Conversely, the server waits for a connection, processes the clients request message, and then sends a response message.
It looks like this:
Step Endpoint Action / Message Content
1 Client Sends a Message containing request content
2 Server Receives and processes client request Message
3 Server Sends a Message containing response content
4 Client Receives and processes server response Message
Heres the file and code layout:
Application File Code
Server app-server.py The servers main script
Server libserver.py The servers Message class
Client app-client.py The clients main script
Client libclient.py The clients Message class
Message Entry Point
Id like to discuss how the Message class works by first mentioning an aspect of its design that wasnt immediately obvious to me. Only after refactoring it at least five times did I arrive at what it is currently. Why? Managing state.
After a Message object is created, its associated with a socket thats monitored for events using selector.register():
Note: Some of the code examples in this section are from the servers main script and Message class, but this section and discussion applies equally to the client as well. Ill show and explain the clients version when it differs.
When events are ready on the socket, theyre returned by selector.select(). We can then get a reference back to the message object using the data attribute on the key object and call a method in Message:
Looking at the event loop above, youll see that sel.select() is in the drivers seat. Its blocking, waiting at the top of the loop for events. Its responsible for waking up when read and write events are ready to be processed on the socket. Which means, indirectly, its also responsible for calling the method process_events(). This is what I mean when I say the method process_events() is the entry point.
Lets see what the process_events() method does:
Thats good: process_events() is simple. It can only do two things: call read() and write().
This brings us back to managing state. After a few refactorings, I decided that if another method depended on state variables having a certain value, then they would only be called from read() and write(). This keeps the logic as simple as possible as events come in on the socket for processing.
This may seem obvious, but the first few iterations of the class were a mix of some methods that checked the current state and, depending on their value, called other methods to process data outside read() or write(). In the end, this proved too complex to manage and keep up with.
You should definitely modify the class to suit your own needs so it works best for you, but Id recommend that you keep the state checks and the calls to methods that depend on that state to the read() and write() methods if possible.
Lets look at read(). This is the servers version, but the clients is the same. It just uses a different method name, process_response() instead of process_request():
The _read() method is called first. It calls socket.recv() to read data from the socket and store it in a receive buffer.
Remember that when socket.recv() is called, all of the data that makes up a complete message may not have arrived yet. socket.recv() may need to be called again. This is why there are state checks for each part of the message before calling the appropriate method to process it.
Before a method processes its part of the message, it first checks to make sure enough bytes have been read into the receive buffer. If there are, it processes its respective bytes, removes them from the buffer and writes its output to a variable thats used by the next processing stage. Since there are three components to a message, there are three state checks and process method calls:
Message Component Method Output
Fixed-length header process_protoheader() self._jsonheader_len
JSON header process_jsonheader() self.jsonheader
Content process_request() self.request
Next, lets look at write(). This is the servers version:
write() checks first for a request. If one exists and a response hasnt been created, create_response() is called. create_response() sets the state variable response_created and writes the response to the send buffer.
The _write() method calls socket.send() if theres data in the send buffer.
Remember that when socket.send() is called, all of the data in the send buffer may not have been queued for transmission. The network buffers for the socket may be full, and socket.send() may need to be called again. This is why there are state checks. create_response() should only be called once, but its expected that _write() will need to be called multiple times.
The client version of write() is similar:
Since the client initiates a connection to the server and sends a request first, the state variable _request_queued is checked. If a request hasnt been queued, it calls queue_request(). queue_request() creates the request and writes it to the send buffer. It also sets the state variable _request_queued so its only called once.
Just like the server, _write() calls socket.send() if theres data in the send buffer.
The notable difference in the clients version of write() is the last check to see if the request has been queued. This will be explained more in the section Client Main Script, but the reason for this is to tell selector.select() to stop monitoring the socket for write events. If the request has been queued and the send buffer is empty, then were done writing and were only interested in read events. Theres no reason to be notified that the socket is writable.
Ill wrap up this section by leaving you with one thought. The main purpose of this section was to explain that selector.select() is calling into the Message class via the method process_events() and to describe how state is managed.
This is important because process_events() will be called many times over the life of the connection. Therefore, make sure that any methods that should only be called once are either checking a state variable themselves, or the state variable set by the method is checked by the caller.
Fourth part is coming soon //Quoted
Multi-Connection Client
Now lets look at the multi-connection client, multiconn-client.py. Its very similar to the server, but instead of listening for connections, it starts by initiating connections via start_connections():
messages = [b'Message 1 from client.', b'Message 2 from client.']
Kod:
[COLOR="PaleGreen"]def start_connections(host, port, num_conns):
    server_addr = (host, port)
    for i in range(0, num_conns):
        connid = i + 1
        print('starting connection', connid, 'to', server_addr)
        sock = socket.socket(socket.AF_INET, socket.SOCK_STREAM)
        sock.setblocking(False)
        sock.connect_ex(server_addr)
        events = selectors.EVENT_READ | selectors.EVENT_WRITE
        data = types.SimpleNamespace(connid=connid,
                                     msg_total=sum(len(m) for m in messages),
                                     recv_total=0,
                                     messages=list(messages),
                                     outb=b'')
        sel.register(sock, events, data=data)[/COLOR]
num_conns is read from the command-line, which is the number of connections to create to the server. Just like the server, each socket is set to non-blocking mode.
connect_ex() is used instead of connect() since connect() would immediately raise a BlockingIOError exception. connect_ex() initially returns an error indicator, errno.EINPROGRESS, instead of raising an exception while the connection is in progress. Once the connection is completed, the socket is ready for reading and writing and is returned as such by select().
After the socket is setup, the data we want stored with the socket is created using the class types.SimpleNamespace. The messages the client will send to the server are copied using list(messages) since each connection will call socket.send() and modify the list. Everything needed to keep track of what the client needs to send, has sent and received, and the total number of bytes in the messages is stored in the object data.
Lets look at service_connection(). Its fundamentally the same as the server:
Kod:
[COLOR="palegreen"]def service_connection(key, mask):
    sock = key.fileobj
    data = key.data
    if mask & selectors.EVENT_READ:
        recv_data = sock.recv(1024)  # Should be ready to read
        if recv_data:
            print('received', repr(recv_data), 'from connection', data.connid)
            data.recv_total += len(recv_data)
        if not recv_data or data.recv_total == data.msg_total:
            print('closing connection', data.connid)
            sel.unregister(sock)
            sock.close()
    if mask & selectors.EVENT_WRITE:
        if not data.outb and data.messages:
            data.outb = data.messages.pop(0)
        if data.outb:
            print('sending', repr(data.outb), 'to connection', data.connid)
            sent = sock.send(data.outb)  # Should be ready to write
data.outb = data.outb[sent:][/COLOR]Theres one important difference. It keeps track of the number of bytes its received from the server so it can close its side of the connection. When the server detects this, it closes its side of the connection too.
Note that by doing this, the server depends on the client being well-behaved: the server expects the client to close its side of the connection when its done sending messages. If the client doesnt close, the server will leave the connection open. In a real application, you may want to guard against this in your server and prevent client connections from accumulating if they dont send a request after a certain amount of time.
Running the Multi-Connection Client and Server
Now lets run multiconn-server.py and multiconn-client.py. They both use command-line arguments. You can run them without arguments to see the options.
For the server, pass a host and port number:
Kod:
[COLOR="Palegreen"]$ ./multiconn-server.py
usage: ./multiconn-server.py <host> <port>[/COLOR]
For the client, also pass the number of connections to create to the server, num_connections:
Kod:
$ ./multiconn-client.py
usage: ./multiconn-client.py <host> <port> <num_connections>
Below is the server output when listening on the loopback interface on port 65432:
Kod:
[COLOR="palegreen"]$ ./multiconn-server.py 127.0.0.1 65432
listening on ('127.0.0.1', 65432)
accepted connection from ('127.0.0.1', 61354)
accepted connection from ('127.0.0.1', 61355)
echoing b'Message 1 from client.Message 2 from client.' to ('127.0.0.1', 61354)
echoing b'Message 1 from client.Message 2 from client.' to ('127.0.0.1', 61355)
closing connection to ('127.0.0.1', 61354)
closing connection to ('127.0.0.1', 61355)[/COLOR]
Below is the client output when it creates two connections to the server above:
Kod:
[COLOR="palegreen"]$ ./multiconn-client.py 127.0.0.1 65432 2
starting connection 1 to ('127.0.0.1', 65432)
starting connection 2 to ('127.0.0.1', 65432)
sending b'Message 1 from client.' to connection 1
sending b'Message 2 from client.' to connection 1
sending b'Message 1 from client.' to connection 2
sending b'Message 2 from client.' to connection 2
received b'Message 1 from client.Message 2 from client.' from connection 1
closing connection 1
received b'Message 1 from client.Message 2 from client.' from connection 2
closing connection 2[/COLOR]
Application Client and Server
The multi-connection client and server example is definitely an improvement compared with where we started. However, lets take one more step and address the shortcomings of the previous multiconn example in a final implementation: the application client and server.
We want a client and server that handles errors appropriately so other connections arent affected. Obviously, our client or server shouldnt come crashing down in a ball of fury if an exception isnt caught. This is something we havent discussed up until now. Ive intentionally left out error handling for brevity and clarity in the examples.
Now that youre familiar with the basic API, non-blocking sockets, and select(), we can add some error handling and discuss the elephant in the room that Ive kept hidden from you behind that large curtain over there. Yes, Im talking about the custom class I mentioned way back in the introduction. I knew you wouldnt forget.
First, lets address the errors:
All errors raise exceptions. The normal exceptions for invalid argument types and out-of-memory conditions can be raised; starting from Python 3.3, errors related to socket or address semantics raise OSError or one of its subclasses.
We need to catch OSError. Another thing I havent mentioned in relation to errors is timeouts. Youll see them discussed in many places in the docü****tion. Timeouts happen and are a normal error. Hosts and routers are rebooted, switch ports go bad, cables go bad, cables get unplugged, you name it. You should be prepared for these and other errors and handle them in your code.
What about the elephant in the room? As hinted by the socket type socket.SOCK_STREAM, when using TCP, youre reading from a continuous stream of bytes. Its like reading from a file on disk, but instead youre reading bytes from the network.
However, unlike reading a file, theres no f.seek(). In other words, you cant reposition the socket pointer, if there was one, and move randomly around the data reading whatever, whenever youd like.
When bytes arrive at your socket, there are network buffers involved. Once youve read them, they need to be saved somewhere. Calling recv() again reads the next stream of bytes available from the socket.
What this means is that youll be reading from the socket in chunks. You need to call recv() and save the data in a buffer until youve read enough bytes to have a complete message that makes sense to your application.
Its up to you to define and keep track of where the message boundaries are. As far as the TCP socket is concerned, its just sending and receiving raw bytes to and from the network. It knows nothing about what those raw bytes mean.
This bring us to defining an application-layer protocol. Whats an application-layer protocol? Put simply, your application will send and receive messages. These messages are your applications protocol.
In other words, the length and format you choose for these messages define the semantics and behavior of your application. This is directly related to what I explained in the previous paragraph regarding reading bytes from the socket. When youre reading bytes with recv(), you need to keep up with how many bytes were read and figure out where the message boundaries are.
How is this done? One way is to always send fixed-length messages. If theyre always the same size, then its easy. When youve read that number of bytes into a buffer, then you know you have one complete message.
However, using fixed-length messages is inefficient for small messages where youd need to use padding to fill them out. Also, youre still left with the problem of what to do about data that doesnt fit into one message.
In this tutorial, well take a generic approach. An approach thats used by many protocols, including HTTP. Well prefix messages with a header that includes the content length as well as any other fields we need. By doing this, well only need to keep up with the header. Once weve read the header, we can process it to determine the length of the messages content and then read that number of bytes to consume it.
Well implement this by creating a custom class that can send and receive messages that contain text or binary data. You can improve and extend it for your own applications. The most important thing is that youll be able to see an example of how this is done.
I need to mention something regarding sockets and bytes that may affect you. As we talked about earlier, when sending and receiving data via sockets, youre sending and receiving raw bytes.
If you receive data and want to use it in a context where its interpreted as multiple bytes, for example a 4-byte integer, youll need to take into account that it could be in a format thats not native to your machines CPU. The client or server on the other end could have a CPU that uses a different byte order than your own. If this is the case, youll need to convert it to your hosts native byte order before using it.
This byte order is referred to as a CPUs endianness. See Byte Endianness in the reference section for details. Well avoıd this issue by taking advantage of Unicode for our message header and using the encoding UTF-8. Since UTF-8 uses an 8-bit encoding, there are no byte ordering issues.
You can find an explanation in Pythons Encodings and Unicode documéntation. Note that this applies to the text header only. Well use an explicit type and encoding defined in the header for the content thats being sent, the message payload. This will allow us to transfer any data wed like (text or binary), in any format.
You can easily determine the byte order of your machine by using sys.byteorder. For example, on my Intel laptop, this happens:
Kod:
[COLOR="PaleGreen"]$ python3 -c 'import sys; print(repr(sys.byteorder))'
'little'[/COLOR]
If I run this in a virtual machine that emulates a big-endian CPU (PowerPC), then this happens:
Kod:
[COLOR="palegreen"]$ python3 -c 'import sys; print(repr(sys.byteorder))'
'big'[/COLOR]
In this example application, our application-layer protocol defines the header as Unicode text with a UTF-8 encoding. For the actual content in the message, the message payload, youll still have to swap the byte order manually if needed.
This will depend on your application and whether or not it needs to process multi-byte binary data from a machine with a different endianness. You can help your client or server implement binary support by adding additional headers and using them to pass parameters, similar to HTTP.
Dont worry if this doesnt make sense yet. In the next section, youll see how all of this works and fits together.
Application Protocol Header
Lets fully define the protocol header. The protocol header is:
- Variable-length text
- Unicode with the encoding UTF-8
- A Python dictionary serialized using JSON
The required headers, or sub-headers, in the protocol headers dictionary are as follows:
byteorder
The byte order of the machine (uses sys.byteorder). This may not be required for your application.
content-length
The length of the content in bytes.
content-type
The type of content in the payload, for example, text/json or binary/my-binary-type.
content-encoding
The encoding used by the content, for example, utf-8 for Unicode text or binary for binary data.
These headers inform the receiver about the content in the payload of the message. This allows you to send arbitrary data while providing enough information so the content can be decoded and interpreted correctly by the receiver. Since the headers are in a dictionary, its easy to add additional headers by inserting key/value pairs as needed.
Sending an Application Message
Theres still a bit of a problem. We have a variable-length header, which is nice and flexible, but how do you know the length of the header when reading it with recv()?
When we previously talked about using recv() and message boundaries, I mentioned that fixed-length headers can be inefficient. Thats true, but were going to use a small, 2-byte, fixed-length header to prefix the JSON header that contains its length.
You can think of this as a hybrid approach to sending messages. In effect, were bootstrapping the message receive process by sending the length of the header first. This makes it easy for our receiver to deconstruct the message.
To give you a better idea of the message format, lets look at a message in its entirety:
A message starts with a fixed-length header of 2 bytes thats an integer in network byte order. This is the length of the next header, the variable-length JSON header. Once weve read 2 bytes with recv(), then we know we can process the 2 bytes as an integer and then read that number of bytes before decoding the UTF-8 JSON header.
The JSON header contains a dictionary of additional headers. One of those is content-length, which is the number of bytes of the messages content (not including the JSON header). Once weve called recv() and read content-length bytes, weve reached a message boundary and read an entire message.
Application Message Class
Finally, the payoff! Lets look at the Message class and see how its used with select() when read and write events happen on the socket.
For this example application, I had to come up with an idea for what types of messages the client and server would use. Were far beyond toy echo clients and servers at this point.
To keep things simple and still demonstrate how things would work in a real application, I created an application protocol that implements a basic search feature. The client sends a search request and the server does a lookup for a match. If the request sent by the client isnt recognized as a search, the server assumes its a binary request and returns a binary response.
After reading the following sections, running the examples, and experimenting with the code, youll see how things work. You can then use the Message class as a starting point and modify it for your own use.
Were really not that far off from the multiconn client and server example. The event loop code stays the same in app-client.py and app-server.py. What Ive done is move the message code into a class named Message and added methods to support reading, writing, and processing of the headers and content. This is a great example for using a class.
As we discussed before and youll see below, working with sockets involves keeping state. By using a class, we keep all of the state, data, and code bundled together in an organized unit. An instance of the class is created for each socket in the client and server when a connection is started or accepted.
The class is mostly the same for both the client and the server for the wrapper and utility methods. They start with an underscore, like Message._json_encode(). These methods simplify working with the class. They help other methods by allowing them to stay shorter and support the DRY principle.
The servers Message class works in essentially the same way as the clients and vice-versa. The difference being that the client initiates the connection and sends a request message, followed by processing the servers response message. Conversely, the server waits for a connection, processes the clients request message, and then sends a response message.
It looks like this:
Step Endpoint Action / Message Content
1 Client Sends a Message containing request content
2 Server Receives and processes client request Message
3 Server Sends a Message containing response content
4 Client Receives and processes server response Message
Heres the file and code layout:
Application File Code
Server app-server.py The servers main script
Server libserver.py The servers Message class
Client app-client.py The clients main script
Client libclient.py The clients Message class
Message Entry Point
Id like to discuss how the Message class works by first mentioning an aspect of its design that wasnt immediately obvious to me. Only after refactoring it at least five times did I arrive at what it is currently. Why? Managing state.
After a Message object is created, its associated with a socket thats monitored for events using selector.register():
Kod:
[COLOR="PaleGreen"]message = libserver.Message(sel, conn, addr)
sel.register(conn, selectors.EVENT_READ, data=message)[/COLOR]
Note: Some of the code examples in this section are from the servers main script and Message class, but this section and discussion applies equally to the client as well. Ill show and explain the clients version when it differs.
When events are ready on the socket, theyre returned by selector.select(). We can then get a reference back to the message object using the data attribute on the key object and call a method in Message:
Kod:
[COLOR="PaleGreen"]while True:
    events = sel.select(timeout=None)
    for key, mask in events:
        # ...
        message = key.data
        message.process_events(mask)[/COLOR]
Looking at the event loop above, youll see that sel.select() is in the drivers seat. Its blocking, waiting at the top of the loop for events. Its responsible for waking up when read and write events are ready to be processed on the socket. Which means, indirectly, its also responsible for calling the method process_events(). This is what I mean when I say the method process_events() is the entry point.
Lets see what the process_events() method does:
Kod:
[COLOR="palegreen"]def process_events(self, mask):
    if mask & selectors.EVENT_READ:
        self.read()
    if mask & selectors.EVENT_WRITE:
self.write()[/COLOR]Thats good: process_events() is simple. It can only do two things: call read() and write().
This brings us back to managing state. After a few refactorings, I decided that if another method depended on state variables having a certain value, then they would only be called from read() and write(). This keeps the logic as simple as possible as events come in on the socket for processing.
This may seem obvious, but the first few iterations of the class were a mix of some methods that checked the current state and, depending on their value, called other methods to process data outside read() or write(). In the end, this proved too complex to manage and keep up with.
You should definitely modify the class to suit your own needs so it works best for you, but Id recommend that you keep the state checks and the calls to methods that depend on that state to the read() and write() methods if possible.
Lets look at read(). This is the servers version, but the clients is the same. It just uses a different method name, process_response() instead of process_request():
Kod:
[COLOR="PaleGreen"]def read(self):
    self._read()

    if self._jsonheader_len is None:
        self.process_protoheader()

    if self._jsonheader_len is not None:
        if self.jsonheader is None:
            self.process_jsonheader()

    if self.jsonheader:
        if self.request is None:
            self.process_request()[/COLOR]
The _read() method is called first. It calls socket.recv() to read data from the socket and store it in a receive buffer.
Remember that when socket.recv() is called, all of the data that makes up a complete message may not have arrived yet. socket.recv() may need to be called again. This is why there are state checks for each part of the message before calling the appropriate method to process it.
Before a method processes its part of the message, it first checks to make sure enough bytes have been read into the receive buffer. If there are, it processes its respective bytes, removes them from the buffer and writes its output to a variable thats used by the next processing stage. Since there are three components to a message, there are three state checks and process method calls:
Message Component Method Output
Fixed-length header process_protoheader() self._jsonheader_len
JSON header process_jsonheader() self.jsonheader
Content process_request() self.request
Next, lets look at write(). This is the servers version:
Kod:
[COLOR="palegreen"]def write(self):
    if self.request:
        if not self.response_created:
            self.create_response()

    self._write()[/COLOR]
write() checks first for a request. If one exists and a response hasnt been created, create_response() is called. create_response() sets the state variable response_created and writes the response to the send buffer.
The _write() method calls socket.send() if theres data in the send buffer.
Remember that when socket.send() is called, all of the data in the send buffer may not have been queued for transmission. The network buffers for the socket may be full, and socket.send() may need to be called again. This is why there are state checks. create_response() should only be called once, but its expected that _write() will need to be called multiple times.
The client version of write() is similar:
Kod:
[COLOR="PaleGreen"]def write(self):
    if not self._request_queued:
        self.queue_request()

    self._write()

    if self._request_queued:
        if not self._send_buffer:
            # Set selector to listen for read events, we're done writing.
            self._set_selector_events_mask('r')[/COLOR]
Since the client initiates a connection to the server and sends a request first, the state variable _request_queued is checked. If a request hasnt been queued, it calls queue_request(). queue_request() creates the request and writes it to the send buffer. It also sets the state variable _request_queued so its only called once.
Just like the server, _write() calls socket.send() if theres data in the send buffer.
The notable difference in the clients version of write() is the last check to see if the request has been queued. This will be explained more in the section Client Main Script, but the reason for this is to tell selector.select() to stop monitoring the socket for write events. If the request has been queued and the send buffer is empty, then were done writing and were only interested in read events. Theres no reason to be notified that the socket is writable.
Ill wrap up this section by leaving you with one thought. The main purpose of this section was to explain that selector.select() is calling into the Message class via the method process_events() and to describe how state is managed.
This is important because process_events() will be called many times over the life of the connection. Therefore, make sure that any methods that should only be called once are either checking a state variable themselves, or the state variable set by the method is checked by the caller.
Fourth part is coming soon //Quoted

