

Greetings Dear Turk Hack Team Members, in this tutorial you'll continue to learn python socket module.
Server Main Script
In the servers main script app-server.py, arguments are read from the command line that specify the interface and port to listen on:
For example, to listen on the loopback interface on port 65432, enter:
Use an empty string for <host> to listen on all interfaces.
After creating the socket, a call is made to socket.setsockopt() with the option socket.SO_REUSEADDR:
Setting this socket option avoıds the error Address already in use. Youll see this when starting the server and a previously used TCP socket on the same port has connections in the TIME_WAIT state.
For example, if the server actively closed a connection, it will remain in the TIME_WAIT state for two minutes or more, depending on the operating system. If you try to start the server again before the TIME_WAIT state expires, youll get an OSError exception of Address already in use. This is a safeguard to make sure that any delayed packets in the network arent delivered to the wrong application.
The event loop catches any errors so the server can stay up and continue to run:
When a client connection is accepted, a Message object is created:
The Message object is associated with the socket in the call to sel.register() and is initially set to be monitored for read events only. Once the request has been read, well modify it to listen for write events only.
An advantage of taking this approach in the server is that in most cases, when a socket is healthy and there are no network issues, it will always be writable.
If we told sel.register() to also monitor EVENT_WRITE, the event loop would immediately wakeup and notify us that this is the case. However, at this point, theres no reason to wake up and call send() on the socket. Theres no response to send since a request hasnt been processed yet. This would consume and waste valuable CPU cycles.
Server Message Class
In the section Message Entry Point, we looked at how the Message object was called into action when socket events were ready via process_events(). Now lets look at what happens as data is read on the socket and a component, or piece, of the message is ready to be processed by the server.
The servers message class is in libserver.py. You can find the source code on GitHub.
The methods appear in the class in the order in which processing takes place for a message.
When the server has read at least 2 bytes, the fixed-length header can be processed:
The fixed-length header is a 2-byte integer in network (big-endian) byte order that contains the length of the JSON header. struct.unpack() is used to read the value, decode it, and store it in self._jsonheader_len. After processing the piece of the message its responsible for, process_protoheader() removes it from the receive buffer.
Just like the fixed-length header, when theres enough data in the receive buffer to contain the JSON header, it can be processed as well:
The method self._json_decode() is called to decode and deserialize the JSON header into a dictionary. Since the JSON header is defined as Unicode with a UTF-8 encoding, utf-8 is hardcoded in the call. The result is saved to self.jsonheader. After processing the piece of the message its responsible for, process_jsonheader() removes it from the receive buffer.
Next is the actual content, or payload, of the message. Its described by the JSON header in self.jsonheader. When content-length bytes are available in the receive buffer, the request can be processed:
After saving the message content to the data variable, process_request() removes it from the receive buffer. Then, if the content type is JSON, it decodes and deserializes it. If its not, for this example application, it assumes its a binary request and simply prints the content type.
The last thing process_request() does is modify the selector to monitor write events only. In the servers main script, app-server.py, the socket is initially set to monitor read events only. Now that the request has been fully processed, were no longer interested in reading.
A response can now be created and written to the socket. When the socket is writable, create_response() is called from write():
A response is created by calling other methods, depending on the content type. In this example application, a simple dictionary lookup is done for JSON requests when action == 'search'. You can define other methods for your own applications that get called here.
After creating the response message, the state variable self.response_created is set so write() doesnt call create_response() again. Finally, the response is appended to the send buffer. This is seen by and sent via _write().
One tricky bit to figure out was how to close the connection after the response is written. I put the call to close() in the method _write():
Although its somewhat hidden, I think its an acceptable trade-off given that the Message class only handles one message per connection. After the response is written, theres nothing left for the server to do. Its completed its work.
Client Main Script
In the clients main script app-client.py, arguments are read from the command line and used to create requests and start connections to the server:
Heres an example:
After creating a dictionary representing the request from the command-line arguments, the host, port, and request dictionary are passed to start_connection():
A socket is created for the server connection as well as a Message object using the request dictionary.
Like the server, the Message object is associated with the socket in the call to sel.register(). However, for the client, the socket is initially set to be monitored for both read and write events. Once the request has been written, well modify it to listen for read events only.
This approach gives us the same advantage as the server: not wasting CPU cycles. After the request has been sent, were no longer interested in write events, so theres no reason to wake up and process them.
Client Message Class
In the section Message Entry Point, we looked at how the message object was called into action when socket events were ready via process_events(). Now lets look at what happens after data is read and written on the socket and a message is ready to be processed by the client.
The clients message class is in libclient.py. You can find the source code on GitHub.
The methods appear in the class in the order in which processing takes place for a message.
The first task for the client is to queue the request:
The dictionaries used to create the request, depending on what was passed on the command line, are in the clients main script, app-client.py. The request dictionary is passed as an argument to the class when a Message object is created.
The request message is created and appended to the send buffer, which is then seen by and sent via _write(). The state variable self._request_queued is set so queue_request() isnt called again.
After the request has been sent, the client waits for a response from the server.
The methods for reading and processing a message in the client are the same as the server. As response data is read from the socket, the process header methods are called: process_protoheader() and process_jsonheader().
The difference is in the naming of the final process methods and the fact that theyre processing a response, not creating one: process_response(), _process_response_json_content(), and _process_response_binary_content().
Last, but certainly not least, is the final call for process_response():
Message Class Wrapup
Ill conclude the Message class discussion by mentioning a couple of things that are important to notice with a few of the supporting methods.
Any exceptions raised by the class are caught by the main script in its except clause:
Note the last line: message.close().
This is a really important line, for more than one reason! Not only does it make sure that the socket is closed, but message.close() also removes the socket from being monitored by select(). This greatly simplifies the code in the class and reduces complexity. If theres an exception or we explicitly raise one ourselves, we know close() will take care of the cleanup.
The methods Message._read() and Message._write() also contain something interesting:
Note the except line: except BlockingIOError:.
_write() has one too. These lines are important because they catch a temporary error and skip over it using pass. The temporary error is when the socket would block, for example if its waiting on the network or the other end of the connection (its peer).
By catching and skipping over the exception with pass, select() will eventually call us again, and well get another chance to read or write the data.
Running the Application Client and Server
After all of this hard work, lets have some fun and run some searches!
In these examples, Ill run the server so it listens on all interfaces by passing an empty string for the host argument. This will allow me to run the client and connect from a virtual machine thats on another network. It emulates a big-endian PowerPC machine.
First, lets start the server:
Now lets run the client and enter a search. Lets see if we can find him:
My terminal is running a shell thats using a text encoding of Unicode (UTF-8), so the output above prints nicely with emojis.
Lets see if we can find the puppies:
Notice the byte string sent over the network for the request in the sending line. Its easier to see if you look for the bytes printed in hex that represent the puppy emoji: \xf0\x9f\x90\xb6. I was able to enter the emoji for the search since my terminal is using Unicode with the encoding UTF-8.
This demonstrates that were sending raw bytes over the network and they need to be decoded by the receiver to be interpreted correctly. This is why we went to all of the trouble to create a header that contains the content type and encoding.
Heres the server output from both client connections above:
Look at the sending line to see the bytes that were written to the clients socket. This is the servers response message.
You can also test sending binary requests to the server if the action argument is anything other than search:
Since the requests content-type is not text/json, the server treats it as a custom binary type and doesnt perform JSON decoding. It simply prints the content-type and returns the first 10 bytes to the client:
Troubleshooting
Inevitably, something wont work, and youll be wondering what to do. Dont worry, it happens to all of us. Hopefully, with the help of this tutorial, your debugger, and favorite search engine, youll be able to get going again with the source code part.
If not, your first stop should be Pythons socket module documéntation. Make sure you read all of the documéntation for each function or method youre calling. Also, read through the Reference section for ideas. In particular, check the Errors section.
Sometimes, its not all about the source code. The source code might be correct, and its just the other host, the client or server. Or it could be the network, for example, a router, firewall, or some other networking device thats playing man-in-the-middle.
For these types of issues, additional tools are essential. Below are a few tools and utilities that might help or at least provide some clues.
ping
ping will check if a host is alive and connected to the network by sending an ICMP echo request. It communicates directly with the operating systems TCP/IP protocol stack, so it works independently from any application running on the host.
Below is an example of running ping on macOS:
Note the statistics at the end of the output. This can be helpful when youre trying to discover intermittent connectivity problems. For example, is there any packet loss? How much latency is there (see the round-trip times)?
If theres a firewall between you and the other host, a pings echo request may not be allowed. Some firewall administrators implement policies that enforce this. The idea being that they dont want their hosts to be discoverable. If this is the case and you have firewall rules added to allow the hosts to communicate, make sure that the rules also allow ICMP to pass between them.
ICMP is the protocol used by ping, but its also the protocol TCP and other lower-level protocols use to communicate error messages. If youre experiencing strange behavior or slow connections, this could be the reason.
ICMP messages are identified by type and code. To give you an idea of the important information they carry, here are a few:
ICMP Type ICMP Code Description
8 0 Echo request
0 0 Echo reply
3 0 Destination network unreachable
3 1 Destination host unreachable
3 2 Destination protocol unreachable
3 3 Destination port unreachable
3 4 Fragmentation required, and DF flag set
11 0 TTL expired in transit
See the article Path MTU Discovery for information regarding fragmentation and ICMP messages. This is an example of something that can cause strange behavior that I mentioned previously.
netstat
In the section Viewing Socket State, we looked at how netstat can be used to display information about sockets and their current state. This utility is available on macOS, Linux, and Windows.
I didnt mention the columns Recv-Q and Send-Q in the example output. These columns will show you the number of bytes that are held in network buffers that are queued for transmission or receipt, but for some reason havent been read or written by the remote or local application.
In other words, the bytes are waiting in network buffers in the operating systems queues. One reason could be the application is CPU bound or is otherwise unable to call socket.recv() or socket.send() and process the bytes. Or there could be network issues affecting communications like congestion or failing network hardware or cabling.
To demonstrate this and see how much data I could send before seeing an error, I wrote a test client that connects to a test server and repeatedly calls socket.send(). The test server never calls socket.recv(). It just accepts the connection. This causes the network buffers on the server to fill, which eventually raises an error on the client.
First, I started the server:
Then I ran the client. Lets see what the error is:
Heres the netstat output while the client and server were still running, with the client printing out the error message above multiple times:
The first entry is the server (Local Address has port 65432):
The second entry is the client (Foreign Address has port 65432):
The client sure was trying to write bytes, but the server wasnt reading them. This caused the servers network buffer queue to fill on the receive side and the clients network buffer queue to fill on the send side.
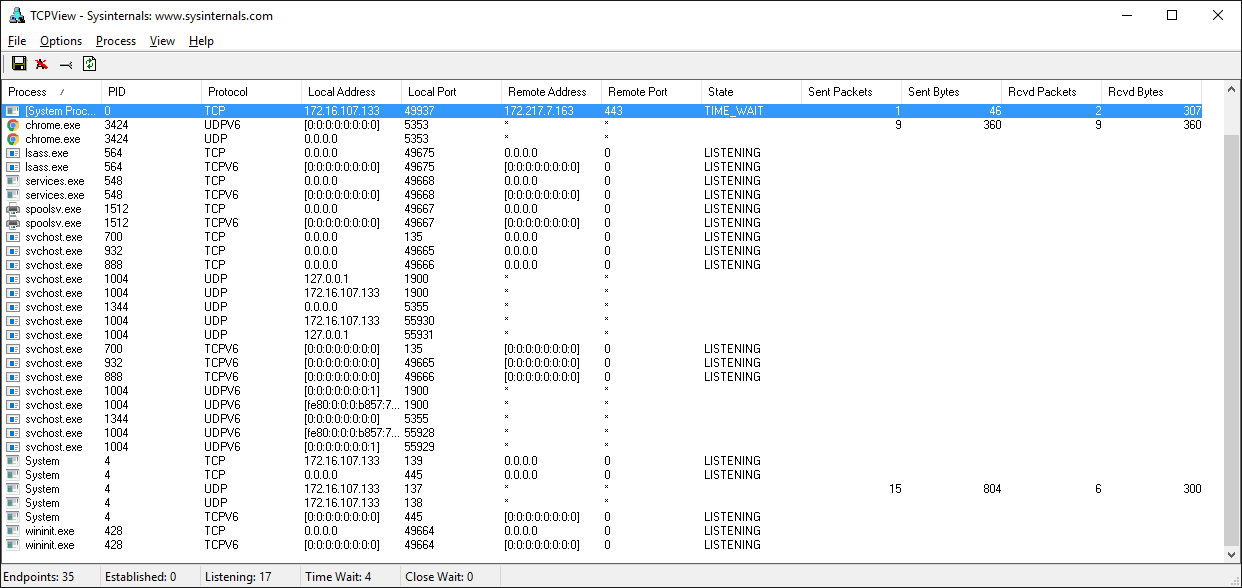
Windows
If you work with Windows, theres a suite of utilities that you should definitely check out if you havent already: Windows Sysinternals.
One of them is TCPView.exe. TCPView is a graphical netstat for Windows. In addition to addresses, port numbers, and socket state, it will show you running totals for the number of packets and bytes, sent and received. Like the Unix utility lsof, you also get the process name and ID. Check the menus for other display options.
Wireshark
Sometimes you need to see whats happening on the wire. Forget about what the application log says or what the value is thats being returned from a library call. You want to see whats actually being sent or received on the network. Just like debuggers, when you need to see it, theres no substitute.
Wireshark is a network protocol analyzer and traffic capture application that runs on macOS, Linux, and Windows, among others. Theres a GUI version named wireshark, and also a terminal, text-based version named tshark.
Running a traffic capture is a great way to watch how an application behaves on the network and gather evidence about what it sends and receives, and how often and how much. Youll also be able to see when a client or server closes or aborts a connection or stops responding. This information can be extremely helpful when youre troubleshooting.
There are many good tutorials and other resources on the web that will walk you through the basics of using Wireshark and TShark.
Heres an example of a traffic capture using Wireshark on the loopback interface:

Heres the same example shown above using tshark:
Last part is coming soon //Quoted
Server Main Script
In the servers main script app-server.py, arguments are read from the command line that specify the interface and port to listen on:
Kod:
$ ./app-server.py
usage: ./app-server.py <host> <port>
For example, to listen on the loopback interface on port 65432, enter:
Kod:
[COLOR="palegreen"]$ ./app-server.py 127.0.0.1 65432
listening on ('127.0.0.1', 65432)[/COLOR]
Use an empty string for <host> to listen on all interfaces.
After creating the socket, a call is made to socket.setsockopt() with the option socket.SO_REUSEADDR:
Kod:
[COLOR="palegreen"]# Avoıd bind() exception: OSError: [Errno 48] Address already in use
lsock.setsockopt(socket.SOL_SOCKET, socket.SO_REUSEADDR, 1)[/COLOR]
Setting this socket option avoıds the error Address already in use. Youll see this when starting the server and a previously used TCP socket on the same port has connections in the TIME_WAIT state.
For example, if the server actively closed a connection, it will remain in the TIME_WAIT state for two minutes or more, depending on the operating system. If you try to start the server again before the TIME_WAIT state expires, youll get an OSError exception of Address already in use. This is a safeguard to make sure that any delayed packets in the network arent delivered to the wrong application.
The event loop catches any errors so the server can stay up and continue to run:
Kod:
[COLOR="palegreen"]while True:
    events = sel.select(timeout=None)
    for key, mask in events:
        if key.data is None:
            accept_wrapper(key.fileobj)
        else:
            message = key.data
            try:
                message.process_events(mask)
            except Exception:
                print('main: error: exception for',
                      f'{message.addr}:\n{traceback.format_exc()}')
                message.close()[/COLOR]
When a client connection is accepted, a Message object is created:
Kod:
[COLOR="palegreen"]def accept_wrapper(sock):
    conn, addr = sock.accept()  # Should be ready to read
    print('accepted connection from', addr)
    conn.setblocking(False)
    message = libserver.Message(sel, conn, addr)
    sel.register(conn, selectors.EVENT_READ, data=message)[/COLOR]
The Message object is associated with the socket in the call to sel.register() and is initially set to be monitored for read events only. Once the request has been read, well modify it to listen for write events only.
An advantage of taking this approach in the server is that in most cases, when a socket is healthy and there are no network issues, it will always be writable.
If we told sel.register() to also monitor EVENT_WRITE, the event loop would immediately wakeup and notify us that this is the case. However, at this point, theres no reason to wake up and call send() on the socket. Theres no response to send since a request hasnt been processed yet. This would consume and waste valuable CPU cycles.
Server Message Class
In the section Message Entry Point, we looked at how the Message object was called into action when socket events were ready via process_events(). Now lets look at what happens as data is read on the socket and a component, or piece, of the message is ready to be processed by the server.
The servers message class is in libserver.py. You can find the source code on GitHub.
The methods appear in the class in the order in which processing takes place for a message.
When the server has read at least 2 bytes, the fixed-length header can be processed:
Kod:
[COLOR="PaleGreen"]def process_protoheader(self):
    hdrlen = 2
    if len(self._recv_buffer) >= hdrlen:
        self._jsonheader_len = struct.unpack('>H',
                                             self._recv_buffer[:hdrlen])[0]
        self._recv_buffer = self._recv_buffer[hdrlen:][/COLOR]
The fixed-length header is a 2-byte integer in network (big-endian) byte order that contains the length of the JSON header. struct.unpack() is used to read the value, decode it, and store it in self._jsonheader_len. After processing the piece of the message its responsible for, process_protoheader() removes it from the receive buffer.
Just like the fixed-length header, when theres enough data in the receive buffer to contain the JSON header, it can be processed as well:
Kod:
[COLOR="palegreen"]def process_jsonheader(self):
    hdrlen = self._jsonheader_len
    if len(self._recv_buffer) >= hdrlen:
        self.jsonheader = self._json_decode(self._recv_buffer[:hdrlen],
                                            'utf-8')
        self._recv_buffer = self._recv_buffer[hdrlen:]
        for reqhdr in ('byteorder', 'content-length', 'content-type',
                       'content-encoding'):
            if reqhdr not in self.jsonheader:
                raise ValueError(f'Missing required header "{reqhdr}".')
[/COLOR]Next is the actual content, or payload, of the message. Its described by the JSON header in self.jsonheader. When content-length bytes are available in the receive buffer, the request can be processed:
Kod:
[COLOR="palegreen"]def process_request(self):
    content_len = self.jsonheader['content-length']
    if not len(self._recv_buffer) >= content_len:
        return
    data = self._recv_buffer[:content_len]
    self._recv_buffer = self._recv_buffer[content_len:]
    if self.jsonheader['content-type'] == 'text/json':
        encoding = self.jsonheader['content-encoding']
        self.request = self._json_decode(data, encoding)
        print('received request', repr(self.request), 'from', self.addr)
    else:
        # Binary or unknown content-type
        self.request = data
        print(f'received {self.jsonheader["content-type"]} request from',
              self.addr)
    # Set selector to listen for write events, we're done reading.
    self._set_selector_events_mask('w')
[/COLOR]The last thing process_request() does is modify the selector to monitor write events only. In the servers main script, app-server.py, the socket is initially set to monitor read events only. Now that the request has been fully processed, were no longer interested in reading.
A response can now be created and written to the socket. When the socket is writable, create_response() is called from write():
Kod:
[COLOR="palegreen"]def create_response(self):
    if self.jsonheader['content-type'] == 'text/json':
        response = self._create_response_json_content()
    else:
        # Binary or unknown content-type
        response = self._create_response_binary_content()
    message = self._create_message(**response)
    self.response_created = True
    self._send_buffer += message[/COLOR]
A response is created by calling other methods, depending on the content type. In this example application, a simple dictionary lookup is done for JSON requests when action == 'search'. You can define other methods for your own applications that get called here.
After creating the response message, the state variable self.response_created is set so write() doesnt call create_response() again. Finally, the response is appended to the send buffer. This is seen by and sent via _write().
One tricky bit to figure out was how to close the connection after the response is written. I put the call to close() in the method _write():
Kod:
[COLOR="palegreen"]def _write(self):
    if self._send_buffer:
        print('sending', repr(self._send_buffer), 'to', self.addr)
        try:
            # Should be ready to write
            sent = self.sock.send(self._send_buffer)
        except BlockingIOError:
            # Resource temporarily unavailable (errno EWOULDBLOCK)
            pass
        else:
            self._send_buffer = self._send_buffer[sent:]
            # Close when the buffer is drained. The response has been sent.
            if sent and not self._send_buffer:
                self.close()[/COLOR]
Although its somewhat hidden, I think its an acceptable trade-off given that the Message class only handles one message per connection. After the response is written, theres nothing left for the server to do. Its completed its work.
Client Main Script
In the clients main script app-client.py, arguments are read from the command line and used to create requests and start connections to the server:
Kod:
[COLOR="palegreen"]$ ./app-client.py
usage: ./app-client.py <host> <port> <action> <value>[/COLOR]Heres an example:
Kod:
$ ./app-client.py 127.0.0.1 65432 search needle
Kod:
[COLOR="palegreen"]def start_connection(host, port, request):
    addr = (host, port)
    print('starting connection to', addr)
    sock = socket.socket(socket.AF_INET, socket.SOCK_STREAM)
    sock.setblocking(False)
    sock.connect_ex(addr)
    events = selectors.EVENT_READ | selectors.EVENT_WRITE
    message = libclient.Message(sel, sock, addr, request)
    sel.register(sock, events, data=message)[/COLOR]
A socket is created for the server connection as well as a Message object using the request dictionary.
Like the server, the Message object is associated with the socket in the call to sel.register(). However, for the client, the socket is initially set to be monitored for both read and write events. Once the request has been written, well modify it to listen for read events only.
This approach gives us the same advantage as the server: not wasting CPU cycles. After the request has been sent, were no longer interested in write events, so theres no reason to wake up and process them.
Client Message Class
In the section Message Entry Point, we looked at how the message object was called into action when socket events were ready via process_events(). Now lets look at what happens after data is read and written on the socket and a message is ready to be processed by the client.
The clients message class is in libclient.py. You can find the source code on GitHub.
The methods appear in the class in the order in which processing takes place for a message.
The first task for the client is to queue the request:
Kod:
[COLOR="palegreen"]def queue_request(self):
    content = self.request['content']
    content_type = self.request['type']
    content_encoding = self.request['encoding']
    if content_type == 'text/json':
        req = {
            'content_bytes': self._json_encode(content, content_encoding),
            'content_type': content_type,
            'content_encoding': content_encoding
        }
    else:
        req = {
            'content_bytes': content,
            'content_type': content_type,
            'content_encoding': content_encoding
        }
    message = self._create_message(**req)
    self._send_buffer += message
    self._request_queued = True[/COLOR]
The dictionaries used to create the request, depending on what was passed on the command line, are in the clients main script, app-client.py. The request dictionary is passed as an argument to the class when a Message object is created.
The request message is created and appended to the send buffer, which is then seen by and sent via _write(). The state variable self._request_queued is set so queue_request() isnt called again.
After the request has been sent, the client waits for a response from the server.
The methods for reading and processing a message in the client are the same as the server. As response data is read from the socket, the process header methods are called: process_protoheader() and process_jsonheader().
The difference is in the naming of the final process methods and the fact that theyre processing a response, not creating one: process_response(), _process_response_json_content(), and _process_response_binary_content().
Last, but certainly not least, is the final call for process_response():
Kod:
[COLOR="PaleGreen"]def process_response(self):
    # ...
    # Close when response has been processed
    self.close()[/COLOR]
Message Class Wrapup
Ill conclude the Message class discussion by mentioning a couple of things that are important to notice with a few of the supporting methods.
Any exceptions raised by the class are caught by the main script in its except clause:
Kod:
[COLOR="palegreen"]try:
    message.process_events(mask)
except Exception:
    print('main: error: exception for',
          f'{message.addr}:\n{traceback.format_exc()}')
    message.close()[/COLOR]
Note the last line: message.close().
This is a really important line, for more than one reason! Not only does it make sure that the socket is closed, but message.close() also removes the socket from being monitored by select(). This greatly simplifies the code in the class and reduces complexity. If theres an exception or we explicitly raise one ourselves, we know close() will take care of the cleanup.
The methods Message._read() and Message._write() also contain something interesting:
Kod:
def _read(self):
    try:
        # Should be ready to read
        data = self.sock.recv(4096)
    except BlockingIOError:
        # Resource temporarily unavailable (errno EWOULDBLOCK)
        pass
    else:
        if data:
            self._recv_buffer += data
        else:
            raise RuntimeError('Peer closed.')
Note the except line: except BlockingIOError:.
_write() has one too. These lines are important because they catch a temporary error and skip over it using pass. The temporary error is when the socket would block, for example if its waiting on the network or the other end of the connection (its peer).
By catching and skipping over the exception with pass, select() will eventually call us again, and well get another chance to read or write the data.
Running the Application Client and Server
After all of this hard work, lets have some fun and run some searches!
In these examples, Ill run the server so it listens on all interfaces by passing an empty string for the host argument. This will allow me to run the client and connect from a virtual machine thats on another network. It emulates a big-endian PowerPC machine.
First, lets start the server:
Kod:
$ ./app-server.py '' 65432
listening on ('', 65432)
Now lets run the client and enter a search. Lets see if we can find him:
Kod:
[COLOR="palegreen"]$ ./app-client.py 10.0.1.1 65432 search morpheus
starting connection to ('10.0.1.1', 65432)
sending b'\x00d{"byteorder": "big", "content-type": "text/json", "content-encoding": "utf-8", "content-length": 41}{"action": "search", "value": "morpheus"}' to ('10.0.1.1', 65432)
received response {'result': 'Follow the white rabbit. 🐰'} from ('10.0.1.1', 65432)
got result: Follow the white rabbit. 🐰
closing connection to ('10.0.1.1', 65432)[/COLOR]
My terminal is running a shell thats using a text encoding of Unicode (UTF-8), so the output above prints nicely with emojis.
Lets see if we can find the puppies:
Kod:
[COLOR="palegreen"]$ ./app-client.py 10.0.1.1 65432 search 🐶
starting connection to ('10.0.1.1', 65432)
sending b'\x00d{"byteorder": "big", "content-type": "text/json", "content-encoding": "utf-8", "content-length": 37}{"action": "search", "value": "\xf0\x9f\x90\xb6"}' to ('10.0.1.1', 65432)
received response {'result': '🐾 Playing ball! 🏐'} from ('10.0.1.1', 65432)
got result: 🐾 Playing ball! 🏐
closing connection to ('10.0.1.1', 65432)[/COLOR]
Notice the byte string sent over the network for the request in the sending line. Its easier to see if you look for the bytes printed in hex that represent the puppy emoji: \xf0\x9f\x90\xb6. I was able to enter the emoji for the search since my terminal is using Unicode with the encoding UTF-8.
This demonstrates that were sending raw bytes over the network and they need to be decoded by the receiver to be interpreted correctly. This is why we went to all of the trouble to create a header that contains the content type and encoding.
Heres the server output from both client connections above:
Kod:
[COLOR="palegreen"]accepted connection from ('10.0.2.2', 55340)
received request {'action': 'search', 'value': 'morpheus'} from ('10.0.2.2', 55340)
sending b'\x00g{"byteorder": "little", "content-type": "text/json", "content-encoding": "utf-8", "content-length": 43}{"result": "Follow the white rabbit. \xf0\x9f\x90\xb0"}' to ('10.0.2.2', 55340)
closing connection to ('10.0.2.2', 55340)

accepted connection from ('10.0.2.2', 55338)
received request {'action': 'search', 'value': '🐶'} from ('10.0.2.2', 55338)
sending b'\x00g{"byteorder": "little", "content-type": "text/json", "content-encoding": "utf-8", "content-length": 37}{"result": "\xf0\x9f\x90\xbe Playing ball! \xf0\x9f\x8f\x90"}' to ('10.0.2.2', 55338)
closing connection to ('10.0.2.2', 55338)[/COLOR]
Look at the sending line to see the bytes that were written to the clients socket. This is the servers response message.
You can also test sending binary requests to the server if the action argument is anything other than search:
Kod:
[COLOR="palegreen"]$ ./app-client.py 10.0.1.1 65432 binary 😃
starting connection to ('10.0.1.1', 65432)
sending b'\x00|{"byteorder": "big", "content-type": "binary/custom-client-binary-type", "content-encoding": "binary", "content-length": 10}binary\xf0\x9f\x98\x83' to ('10.0.1.1', 65432)
received binary/custom-server-binary-type response from ('10.0.1.1', 65432)
got response: b'First 10 bytes of request: binary\xf0\x9f\x98\x83'
closing connection to ('10.0.1.1', 65432)[/COLOR]
Since the requests content-type is not text/json, the server treats it as a custom binary type and doesnt perform JSON decoding. It simply prints the content-type and returns the first 10 bytes to the client:
Kod:
[COLOR="PaleGreen"]$ ./app-server.py '' 65432
listening on ('', 65432)
accepted connection from ('10.0.2.2', 55320)
received binary/custom-client-binary-type request from ('10.0.2.2', 55320)
sending b'\x00\x7f{"byteorder": "little", "content-type": "binary/custom-server-binary-type", "content-encoding": "binary", "content-length": 37}First 10 bytes of request: binary\xf0\x9f\x98\x83' to ('10.0.2.2', 55320)
closing connection to ('10.0.2.2', 55320)[/COLOR]
Troubleshooting
Inevitably, something wont work, and youll be wondering what to do. Dont worry, it happens to all of us. Hopefully, with the help of this tutorial, your debugger, and favorite search engine, youll be able to get going again with the source code part.
If not, your first stop should be Pythons socket module documéntation. Make sure you read all of the documéntation for each function or method youre calling. Also, read through the Reference section for ideas. In particular, check the Errors section.
Sometimes, its not all about the source code. The source code might be correct, and its just the other host, the client or server. Or it could be the network, for example, a router, firewall, or some other networking device thats playing man-in-the-middle.
For these types of issues, additional tools are essential. Below are a few tools and utilities that might help or at least provide some clues.
ping
ping will check if a host is alive and connected to the network by sending an ICMP echo request. It communicates directly with the operating systems TCP/IP protocol stack, so it works independently from any application running on the host.
Below is an example of running ping on macOS:
Kod:
[COLOR="PaleGreen"]$ ping -c 3 127.0.0.1
PING 127.0.0.1 (127.0.0.1): 56 data bytes
64 bytes from 127.0.0.1: icmp_seq=0 ttl=64 time=0.058 ms
64 bytes from 127.0.0.1: icmp_seq=1 ttl=64 time=0.165 ms
64 bytes from 127.0.0.1: icmp_seq=2 ttl=64 time=0.164 ms

--- 127.0.0.1 ping statistics ---
3 packets transmitted, 3 packets received, 0.0% packet loss
round-trip min/avg/max/stddev = 0.058/0.129/0.165/0.050 ms[/COLOR]
Note the statistics at the end of the output. This can be helpful when youre trying to discover intermittent connectivity problems. For example, is there any packet loss? How much latency is there (see the round-trip times)?
If theres a firewall between you and the other host, a pings echo request may not be allowed. Some firewall administrators implement policies that enforce this. The idea being that they dont want their hosts to be discoverable. If this is the case and you have firewall rules added to allow the hosts to communicate, make sure that the rules also allow ICMP to pass between them.
ICMP is the protocol used by ping, but its also the protocol TCP and other lower-level protocols use to communicate error messages. If youre experiencing strange behavior or slow connections, this could be the reason.
ICMP messages are identified by type and code. To give you an idea of the important information they carry, here are a few:
ICMP Type ICMP Code Description
8 0 Echo request
0 0 Echo reply
3 0 Destination network unreachable
3 1 Destination host unreachable
3 2 Destination protocol unreachable
3 3 Destination port unreachable
3 4 Fragmentation required, and DF flag set
11 0 TTL expired in transit
See the article Path MTU Discovery for information regarding fragmentation and ICMP messages. This is an example of something that can cause strange behavior that I mentioned previously.
netstat
In the section Viewing Socket State, we looked at how netstat can be used to display information about sockets and their current state. This utility is available on macOS, Linux, and Windows.
I didnt mention the columns Recv-Q and Send-Q in the example output. These columns will show you the number of bytes that are held in network buffers that are queued for transmission or receipt, but for some reason havent been read or written by the remote or local application.
In other words, the bytes are waiting in network buffers in the operating systems queues. One reason could be the application is CPU bound or is otherwise unable to call socket.recv() or socket.send() and process the bytes. Or there could be network issues affecting communications like congestion or failing network hardware or cabling.
To demonstrate this and see how much data I could send before seeing an error, I wrote a test client that connects to a test server and repeatedly calls socket.send(). The test server never calls socket.recv(). It just accepts the connection. This causes the network buffers on the server to fill, which eventually raises an error on the client.
First, I started the server:
Kod:
[COLOR="PaleGreen"]$ ./app-server-test.py 127.0.0.1 65432
listening on ('127.0.0.1', 65432)[/COLOR]
Then I ran the client. Lets see what the error is:
Kod:
[COLOR="palegreen"]$ ./app-client-test.py 127.0.0.1 65432 binary test
error: socket.send() blocking io exception for ('127.0.0.1', 65432):
BlockingIOError(35, 'Resource temporarily unavailable')[/COLOR]Heres the netstat output while the client and server were still running, with the client printing out the error message above multiple times:
Kod:
[COLOR="palegreen"]$ netstat -an | grep 65432
Proto Recv-Q Send-Q  Local Address          Foreign Address        (state)
tcp4  408300      0  127.0.0.1.65432        127.0.0.1.53225        ESTABLISHED
tcp4       0 269868  127.0.0.1.53225        127.0.0.1.65432        ESTABLISHED
tcp4       0      0  127.0.0.1.65432        *.*                    LISTEN[/COLOR]
The first entry is the server (Local Address has port 65432):
Kod:
[COLOR="palegreen"]Proto Recv-Q Send-Q  Local Address          Foreign Address        (state)
tcp4  408300      0  127.0.0.1.65432        127.0.0.1.53225        ESTABLISHED
Notice the Recv-Q: 408300.[/COLOR]
The second entry is the client (Foreign Address has port 65432):
Kod:
[COLOR="palegreen"]Proto Recv-Q Send-Q  Local Address          Foreign Address        (state)
tcp4       0 269868  127.0.0.1.53225        127.0.0.1.65432        ESTABLISHED
Notice the Send-Q: 269868.
[/COLOR]Windows
If you work with Windows, theres a suite of utilities that you should definitely check out if you havent already: Windows Sysinternals.
One of them is TCPView.exe. TCPView is a graphical netstat for Windows. In addition to addresses, port numbers, and socket state, it will show you running totals for the number of packets and bytes, sent and received. Like the Unix utility lsof, you also get the process name and ID. Check the menus for other display options.
Wireshark
Sometimes you need to see whats happening on the wire. Forget about what the application log says or what the value is thats being returned from a library call. You want to see whats actually being sent or received on the network. Just like debuggers, when you need to see it, theres no substitute.
Wireshark is a network protocol analyzer and traffic capture application that runs on macOS, Linux, and Windows, among others. Theres a GUI version named wireshark, and also a terminal, text-based version named tshark.
Running a traffic capture is a great way to watch how an application behaves on the network and gather evidence about what it sends and receives, and how often and how much. Youll also be able to see when a client or server closes or aborts a connection or stops responding. This information can be extremely helpful when youre troubleshooting.
There are many good tutorials and other resources on the web that will walk you through the basics of using Wireshark and TShark.
Heres an example of a traffic capture using Wireshark on the loopback interface:
Heres the same example shown above using tshark:
Kod:
[COLOR="PaleGreen"]$ tshark -i lo0 'tcp port 65432'
Capturing on 'Loopback'
    1   0.000000    127.0.0.1 → 127.0.0.1    TCP 68 53942 → 65432 [SYN] Seq=0 Win=65535 Len=0 MSS=16344 WS=32 TSval=940533635 TSecr=0 SACK_PERM=1
    2   0.000057    127.0.0.1 → 127.0.0.1    TCP 68 65432 → 53942 [SYN, ACK] Seq=0 Ack=1 Win=65535 Len=0 MSS=16344 WS=32 TSval=940533635 TSecr=940533635 SACK_PERM=1
    3   0.000068    127.0.0.1 → 127.0.0.1    TCP 56 53942 → 65432 [ACK] Seq=1 Ack=1 Win=408288 Len=0 TSval=940533635 TSecr=940533635
    4   0.000075    127.0.0.1 → 127.0.0.1    TCP 56 [TCP Window Update] 65432 → 53942 [ACK] Seq=1 Ack=1 Win=408288 Len=0 TSval=940533635 TSecr=940533635
    5   0.000216    127.0.0.1 → 127.0.0.1    TCP 202 53942 → 65432 [PSH, ACK] Seq=1 Ack=1 Win=408288 Len=146 TSval=940533635 TSecr=940533635
    6   0.000234    127.0.0.1 → 127.0.0.1    TCP 56 65432 → 53942 [ACK] Seq=1 Ack=147 Win=408128 Len=0 TSval=940533635 TSecr=940533635
    7   0.000627    127.0.0.1 → 127.0.0.1    TCP 204 65432 → 53942 [PSH, ACK] Seq=1 Ack=147 Win=408128 Len=148 TSval=940533635 TSecr=940533635
    8   0.000649    127.0.0.1 → 127.0.0.1    TCP 56 53942 → 65432 [ACK] Seq=147 Ack=149 Win=408128 Len=0 TSval=940533635 TSecr=940533635
    9   0.000668    127.0.0.1 → 127.0.0.1    TCP 56 65432 → 53942 [FIN, ACK] Seq=149 Ack=147 Win=408128 Len=0 TSval=940533635 TSecr=940533635
   10   0.000682    127.0.0.1 → 127.0.0.1    TCP 56 53942 → 65432 [ACK] Seq=147 Ack=150 Win=408128 Len=0 TSval=940533635 TSecr=940533635
   11   0.000687    127.0.0.1 → 127.0.0.1    TCP 56 [TCP Dup ACK 6#1] 65432 → 53942 [ACK] Seq=150 Ack=147 Win=408128 Len=0 TSval=940533635 TSecr=940533635
   12   0.000848    127.0.0.1 → 127.0.0.1    TCP 56 53942 → 65432 [FIN, ACK] Seq=147 Ack=150 Win=408128 Len=0 TSval=940533635 TSecr=940533635
   13   0.001004    127.0.0.1 → 127.0.0.1    TCP 56 65432 → 53942 [ACK] Seq=150 Ack=148 Win=408128 Len=0 TSval=940533635 TSecr=940533635
^C13 packets captured[/COLOR]
Last part is coming soon //Quoted

