

Ben Bunjo, bu konuda kendim yazmış olduğum projem olan grafiksel arayüzlü "BunjRuter" aracını "Ruby/Tk" ile nasıl kodladığımı anlatmak istiyorum, bu sayede görsel programlamanın temellerini atacağız. Ruby ile GUI (Graphical User Interface - Grafiksel Kullanıcı Arayüzü) programlamaya giriş yapmak için bazı genel kavramlara aşina olmanız önemlidir. İşte temel GUI programlaması kavramları:
Not: Program güncelleme ve geliştirme aşamsındadır aynı ismi kullanmak zorunda değilsiniz, sizde burada anlatacaklarım ile kendi grafik arayüzlü hacker toolkitinizi oluşturabilirsiniz.
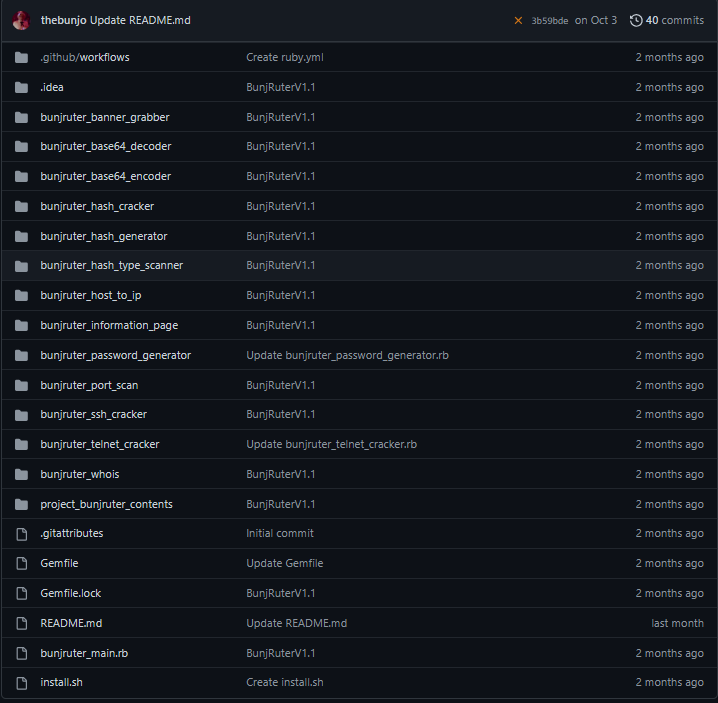
Project BunjRuter: GitHub - thebunjo/BunjRuter: Bunjruter - Multi-Tool GUI Application
Kütüphaneyi indirelim:
Windows:
Linux:
Bu örnekte, TkRoot.new ile bir ana pencere oluşturulur ve title metoduyla pencere başlığı belirlenir. Tk.mainloop ile olay döngüsü başlatılır.

Bu örnekte, bir düğme eklenir ve düğmeye tıklanıldığında bir mesaj kutusu görüntülenir. command ile belirtilen blok, düğmeye tıklandığında çalışacak olan işlevi temsil eder.
Bu örnekte, bir etiket eklenir ve pencerede görüntülenecek metin belirlenir.
Bu örnekte, bir giriş kutusu oluşturulur ve bir düğme ile bu giriş kutusundaki metni alarak bir mesaj kutusunda gösterir.
Bu örnekte, bir Listbox oluşturulur ve Listbox'a öğeler eklenir. Ardından, seçilen öğeyi gösteren bir düğme eklenir.

Bu örnekte, bir menü çubuğu ve menüler oluşturulur. Menü öğeleri eklenir ve bu öğeler için işlevler belirlenir.
Vereceğim örnekler bu kadardı şimdi ise asıl konumuza geçelim.
Benim projemdeki dosya arşivim bu şekilde sizde istediğiniz gibi yapabilirsiniz. (Yaptığınız isimlere göre projenizi düzenlemeniz gerecektir.)
Koda geçelim:
Gençler size bu eğitimi hazırlamak yaklaşık 2.5 saatimi aldı , konuyu beğenirseniz ve projeme yıldız verirseniz çok memnun olurum. Teşekkür ederim.
- Pencere (Window): GUI uygulamalarında kullanıcı arayüzü genellikle bir veya birden fazla pencere içerir. Her pencere, kullanıcının etkileşimde bulunduğu bir bölgeyi temsil eder.
- Widget: Widget, kullanıcı arayüzünde bir bileşeni temsil eder. Örneğin, düğmeler, metin kutuları, etiketler gibi kullanıcı arayüzü elemanları widget olarak adlandırılır.
- Layout Manager: Bir penceredeki widget'ları düzenlemek ve konumlandırmak için kullanılan araçlardır. Widget'ların penceredeki yerini belirlemek için kullanılır.
- Event (Olay): Kullanıcının fareyle tıklaması, bir tuşa basması gibi eylemler olayları oluşturur. Olaylar, GUI uygulamasında belirli bir işlevi tetiklemek için kullanılır.
- Callback (Geribildirim): Bir olayın meydana gelmesi durumunda çağrılan bir fonksiyondur. Örneğin, bir düğmeye tıklanıldığında çalıştırılacak fonksiyon bir geribildirim olarak adlandırılabilir.
- GUI Kütüphanesi: GUI programlama için kullanılan kütüphaneler, programcılara pencere, widget, olaylar gibi temel öğeleri oluşturma ve yönetme imkanı sağlar. Ruby'de bu kütüphanelerden biri Ruby/Tk, diğeri ise FXRuby'dir.
Not: Program güncelleme ve geliştirme aşamsındadır aynı ismi kullanmak zorunda değilsiniz, sizde burada anlatacaklarım ile kendi grafik arayüzlü hacker toolkitinizi oluşturabilirsiniz.
Project BunjRuter: GitHub - thebunjo/BunjRuter: Bunjruter - Multi-Tool GUI Application
Kütüphaneyi indirelim:
Windows:
Rich (BB code):
gem install tkLinux:
Rich (BB code):
sudo apt-get install -y tcl-dev tk-de
Rich (BB code):
sudo gem install tk -- --with-tcltkversion=8.6 --with-tcl-lib=/usr/lib/x86_64-linux-gnu --with-tk-lib=/usr/lib/x86_64-linux-gnu --with-tcl-include=/usr/include/tcl8.6 --with-tk-include=/usr/include/tcl8.6 --enable-pthread1. Pencere Oluşturma:
Ruby:
require 'tk'

# Pencere oluştur
root = TkRoot.new { title "Ruby/Tk Pencere" }

# Tk.mainloop ile olay döngüsünü başlat
Tk.mainloop
Bu örnekte, TkRoot.new ile bir ana pencere oluşturulur ve title metoduyla pencere başlığı belirlenir. Tk.mainloop ile olay döngüsü başlatılır.
2. Düğme Ekleme ve Callback Kullanma:
Ruby:
require 'tk'
# Pencere oluştur
root = TkRoot.new { title "Ruby/Tk Düğme Örneği" }
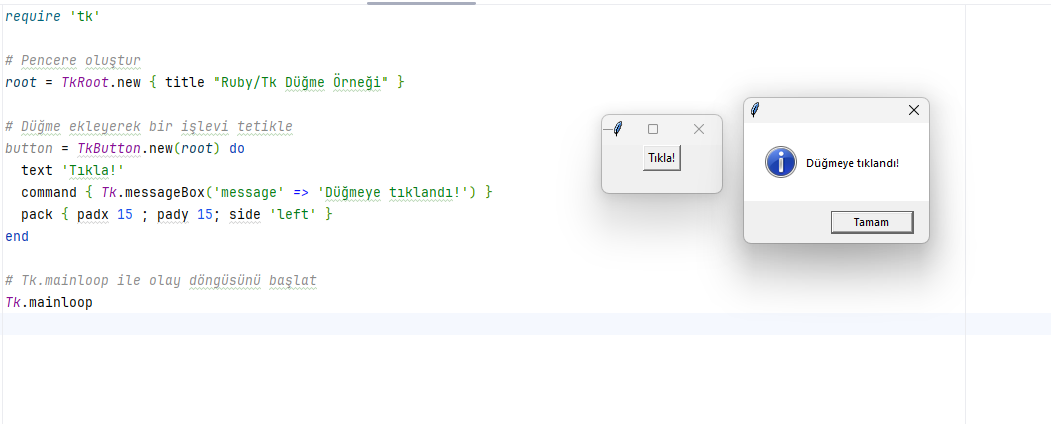
# Düğme ekleyerek bir işlevi tetikle
button = TkButton.new(root) do
text 'Tıkla!'
command { Tk.messageBox('message' => 'Düğmeye tıklandı!') }
pack { padx 15 ; pady 15; side 'left' }
end
# Tk.mainloop ile olay döngüsünü başlat
Tk.mainloopBu örnekte, bir düğme eklenir ve düğmeye tıklanıldığında bir mesaj kutusu görüntülenir. command ile belirtilen blok, düğmeye tıklandığında çalışacak olan işlevi temsil eder.
3. Etiket Ekleme:
Ruby:
require 'tk'
# Pencere oluştur
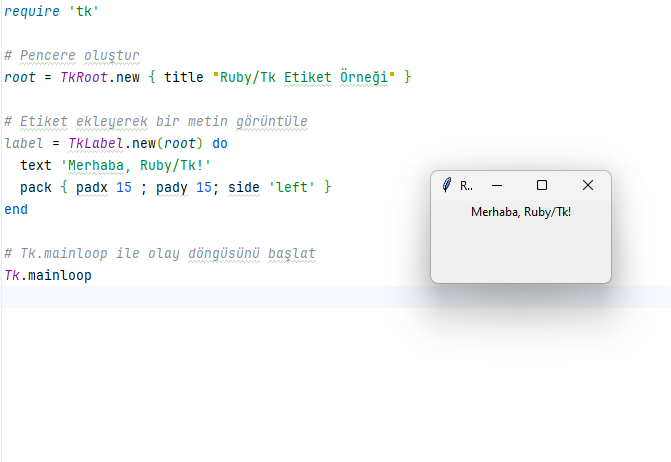
root = TkRoot.new { title "Ruby/Tk Etiket Örneği" }
# Etiket ekleyerek bir metin görüntüle
label = TkLabel.new(root) do
text 'Merhaba, Ruby/Tk!'
pack { padx 15 ; pady 15; side 'left' }
end
# Tk.mainloop ile olay döngüsünü başlat
Tk.mainloopBu örnekte, bir etiket eklenir ve pencerede görüntülenecek metin belirlenir.
4. Giriş Kutusu (Entry) Kullanımı:
Ruby:
require 'tk'
# Pencere oluştur
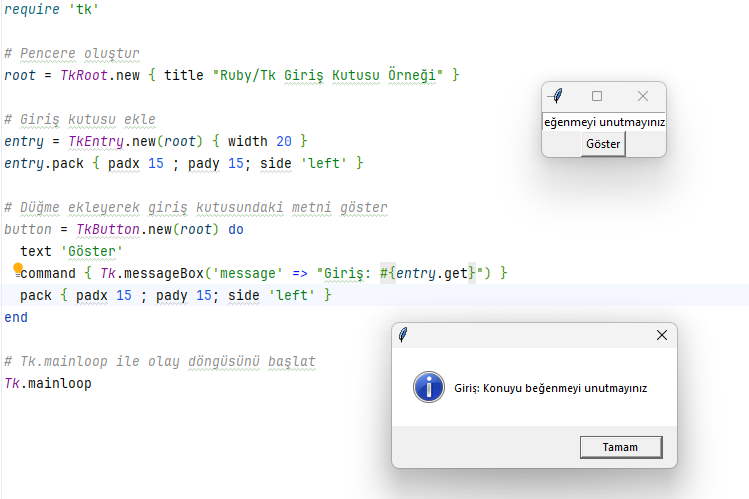
root = TkRoot.new { title "Ruby/Tk Giriş Kutusu Örneği" }
# Giriş kutusu ekle
entry = TkEntry.new(root) { width 20 }
entry.pack { padx 15 ; pady 15; side 'left' }
# Düğme ekleyerek giriş kutusundaki metni göster
button = TkButton.new(root) do
text 'Göster'
command { Tk.messageBox('message' => "Giriş: #{entry.get}") }
pack { padx 15 ; pady 15; side 'left' }
end
# Tk.mainloop ile olay döngüsünü başlat
Tk.mainloopBu örnekte, bir giriş kutusu oluşturulur ve bir düğme ile bu giriş kutusundaki metni alarak bir mesaj kutusunda gösterir.
5. Listbox Kullanımı:
Ruby:
require 'tk'

# Pencere oluştur
root = TkRoot.new { title "Ruby/Tk Listbox Örneği" }

# Listbox oluştur
listbox = TkListbox.new(root) do
  width 20
  height 5
  pack { padx 15 ; pady 15; side 'left' }
end

# Listbox'a öğeler ekle
['Öğe 1', 'Öğe 2', 'Öğe 3', 'Öğe 4'].each { |item| listbox.insert('end', item) }

# Seçilen öğeyi gösteren düğme
button = TkButton.new(root) do
  text 'Göster'
  command { Tk.messageBox('message' => "Seçilen: #{listbox.get(listbox.curselection)}") if listbox.curselection.size > 0 }
  pack { padx 15 ; pady 15; side 'left' }
end

# Tk.mainloop ile olay döngüsünü başlat
Tk.mainloop
Bu örnekte, bir Listbox oluşturulur ve Listbox'a öğeler eklenir. Ardından, seçilen öğeyi gösteren bir düğme eklenir.
6. Menü Kullanımı:
Ruby:
require 'tk'
# Pencere oluştur
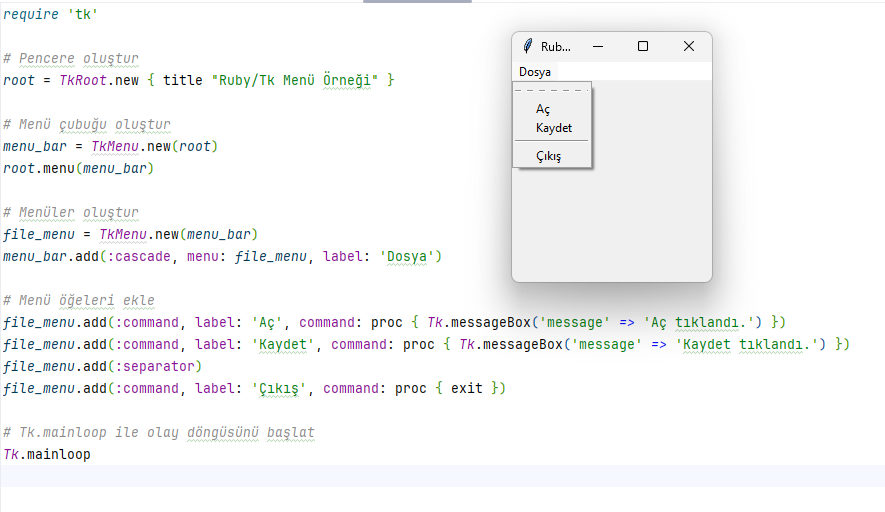
root = TkRoot.new { title "Ruby/Tk Menü Örneği" }
# Menü çubuğu oluştur
menu_bar = TkMenu.new(root)
root.menu(menu_bar)
# Menüler oluştur
file_menu = TkMenu.new(menu_bar)
menu_bar.add(:cascade, menu: file_menu, label: 'Dosya')
# Menü öğeleri ekle
file_menu.add(:command, label: 'Aç', command: proc { Tk.messageBox('message' => 'Aç tıklandı.') })
file_menu.add(:command, label: 'Kaydet', command: proc { Tk.messageBox('message' => 'Kaydet tıklandı.') })
file_menu.add(:separator)
file_menu.add(:command, label: 'Çıkış', command: proc { exit })
# Tk.mainloop ile olay döngüsünü başlat
Tk.mainloopBu örnekte, bir menü çubuğu ve menüler oluşturulur. Menü öğeleri eklenir ve bu öğeler için işlevler belirlenir.
Vereceğim örnekler bu kadardı şimdi ise asıl konumuza geçelim.
Benim projemdeki dosya arşivim bu şekilde sizde istediğiniz gibi yapabilirsiniz. (Yaptığınız isimlere göre projenizi düzenlemeniz gerecektir.)
Koda geçelim:
Ruby:
$VERBOSE = nil # $VERBOSE = false
require 'tk'

$mutex = Mutex.new

def error_messagebox(message)
  Tk.messageBox(
    'type' => 'error',
    'icon' => 'error',
    'title' => 'BunjRuter Error',
    'message' => message
  )
end
Ruby:
def open_page(folder_path, program_name)
  open_page_thread = Thread.new do
    begin
      system("ruby ./#{folder_path}/#{program_name}")
    rescue Exception => exception_open_page
      open_page_error_message = exception_open_page.message
      Tk.messageBox(
        'type' => 'error',
        'icon' => 'error',
        'title' => 'BunjRuter Error',
        'message' => open_page_error_message
      )
    end
  end
end
Ruby:
class BunjRuterApp
  def bunjruter_main
    begin
      # BunjRuter Main Project
      bunjRuter_main_window = TkRoot.new
      bunjRuter_main_window.title = "Project BunjRuter - Main"
      bunjRuter_main_window.geometry("400x395+730+270")
      bunjRuter_main_window.resizable(false, false)

      bunjRuter_main_icon = TkPhotoImage.new(
        file: './project_bunjruter_contents/project_bunjruter_icons/bunjruter_main.png'
      )
      bunjRuter_main_window.iconphoto(bunjRuter_main_icon)
      bunjRuter_main_window_background_label = TkLabel.new
      bunjRuter_main_window_background_label.place(relwidth: 1, relheight: 1)

      font_name, font_size = "Calibri", 10
      custom_font = TkFont.new(family: font_name, size: font_size)

      # Content

      bunjRuter_main_wallpaper = TkPhotoImage.new(
        file: './project_bunjruter_contents/project_bunjruter_wallpapers/bunjruter.png'
      )

      bunjRuter_main_window_background_label.configure(image: bunjRuter_main_wallpaper)
Ruby:
# Buttons
      button_style = {
        fg: "white",
        bg: "#A30039",
        font: custom_font,
        relief: "raised",
        borderwidth: 1,
        width: 11,
        padx: 10,
        pady: 5,
        compound: 'center'
      }

      background_label = TkLabel.new(bunjRuter_main_window) do
        image bunjRuter_main_wallpaper
        place(relwidth: 1, relheight: 1)
      end

      # Passwords LabelFrame
      bunjRuter_passwords_label_frame = TkLabelFrame.new(bunjRuter_main_window, text: "Passwords", font: custom_font, relief: 'raised', borderwidth: 1)
      bunjRuter_passwords_label_frame.place(x: 10, y: 5, width: 120, height: 160)

      # Cracking LabelFrame
      bunjRuter_cracking_label_frame = TkLabelFrame.new(bunjRuter_main_window, text: "Cracking", font: custom_font, relief: 'raised', borderwidth: 1)
      bunjRuter_cracking_label_frame.place(x: 140, y: 5, width: 120, height: 160)

      # Discover LabelFrame
      bunjRuter_discover_label_frame = TkLabelFrame.new(bunjRuter_main_window, text: "Discover", font: custom_font, relief: 'raised', borderwidth: 1)
      bunjRuter_discover_label_frame.place(x: 270, y: 5, width: 120, height: 160)
Ruby:
bunjruter_creator_label = TkLabel.new(bunjRuter_main_window) do
        text "Written By TheBunjo."
        font custom_font
        width 16
        place(x: 140, y: 370)
      end

      # Passwords Stage

      bunjruter_open_base64_page_button = TkButton.new(bunjRuter_main_window, button_style) do
        text "Base64"
        command {
          open_page("bunjruter_base64", "bunjruter_base64.rb")
        }
        place(x: 20, y: 24)
      end

      bunjruter_hash_generator_button = TkButton.new(bunjRuter_main_window, button_style) do
        text "Hash Generator"
        command {
          open_page("bunjruter_hash_generator", "bunjruter_hash_generator.rb")
        }
        place(x: 20, y: 57)
      end

      bunjruter_hash_type_scan_button = TkButton.new(bunjRuter_main_window, button_style) do
        text "Hash Type Scan"
        place(x: 20, y: 90)
        command {
          open_page("bunjruter_hash_type_scanner", "bunjruter_hash_type_scanner.rb")
        }
      end

      bunjruter_password_generator_button = TkButton.new(bunjRuter_main_window, button_style) do
        text "Pass Generator"
        place(x: 20, y: 123)
        command {
          open_page("bunjruter_password_generator", "bunjruter_password_generator.rb")
        }
      end
Ruby:
# Cracking Stage
      bunjruter_cracking_label_frame = TkLabelFrame.new(bunjRuter_main_window, text: "Cracking", font: custom_font, relief: 'raised', borderwidth: 1)
      bunjruter_cracking_label_frame.place(x: 140, y: 5, width: 120, height: 160)

      bunjruter_ftp_crack_button = TkButton.new(bunjRuter_main_window, button_style) do
        text "FTP Cracker"
        place(x: 150, y: 24)
        command {
          open_page("bunjruter_ftp_cracker", "bunjruter_ftp_cracker.rb")
        }
      end

      bunjruter_ssh_cracker_button = TkButton.new(bunjRuter_main_window, button_style) do
        text "SSH Cracker"
        place(x: 150, y: 57)
        command {
          open_page("bunjruter_ssh_cracker", "bunjruter_ssh.rb")
        }
      end

      bunjruter_telnet_cracker_button = TkButton.new(bunjRuter_main_window, button_style) do
        text "Telnet Cracker"
        place(x: 150, y: 90)
        command {
          open_page("bunjruter_telnet_cracker", "bunjruter_telnet_cracker.rb")
        }
      end

      bunjruter_hash_cracker_button = TkButton.new(bunjRuter_main_window, button_style) do
        text "Hash Cracker"
        place(x: 150, y: 123)
        command {
          open_page("bunjruter_hash_cracker", "bunjruter_hash_cracker.rb")
        }
      end
Ruby:
 # Discover Stage

      bunjruter_host_to_ip_button = TkButton.new(bunjRuter_main_window, button_style) do
        text "Host To IP"
        place(x: 280, y: 24)
        command {
          open_page("bunjruter_host_to_ip", "bunjruter_host2ip.rb")
        }
      end

      bunjruter_whois_button = TkButton.new(bunjRuter_main_window, button_style) do
        text "Whois"
        place(x: 280, y: 57)
        command {
          open_page("bunjruter_whois", "bunjruter_whois.rb")
        }
      end

      bunjruter_port_scanner_button = TkButton.new(bunjRuter_main_window, button_style) do
        text "Port Scanner"
        place(x: 280, y: 90)
        command {
          open_page("bunjruter_port_scan", "bunjruter_port_scanner.rb")
        }
      end

      bunjruter_banner_grabber_button = TkButton.new(bunjRuter_main_window, button_style) do
        text "Banner Grabber"
        place(x: 280, y: 123)
        command {
          open_page("bunjruter_banner_grabber", "bunjruter_banner_grabber.rb")
        }
      end

      # Info Stage

      bunjruter_info_button = TkButton.new(bunjRuter_main_window, button_style) do
        text "Information"
        width 7
        command {
          open_page("bunjruter_information_page", "bunjruter_info_page.rb")
        }
        place(x: 160, y: 330)
      end

      Tk.mainloop
    rescue StandardError => mainfunc_an_error_message
      error_messagebox(mainfunc_an_error_message.message)
    end
  end
end

if __FILE__ == $0
  bunjruter_app_main = BunjRuterApp.new
  bunjruter_app_main.bunjruter_main
end
Gençler size bu eğitimi hazırlamak yaklaşık 2.5 saatimi aldı
, konuyu beğenirseniz ve projeme yıldız verirseniz çok memnun olurum. Teşekkür ederim.
Son düzenleme: