

Hello, In this article we will install Modsecurity with Nginx. And I will be using the Ubuntu 18.04 platform.
We will install dependencies, but first we need to disable Apache or we will not be able to start NGINX.
Use these commands to disable it.
Now we go back to Terminal to install dependencies and run our commands.

How To Install ModSecurity?
Yeah, now it's time to install ModSecurity.
First we need to download the ModSecurity nginx_refactoring branch, for this we need to run the following commands.
When the download is finished, we will compile with commands.
How To Install Nginx?
Now it's time to download and compile Nginx. The version I will use will be NGINX 1.13.4.
We extract this file with this command:
Let's switch to the root user with the sudo -s command before proceeding with the compilation process.
We'll compile these commands after passing:
Now it's time to change the default nginx user.
We need to use the following command to test the installation.

Now it's time to run OWASP Rule Configurations and OWASP tests.
Creating A Systemd Volume File
To make sure NGINX can start at boot
We need to create a new systemd file with that command.
We save this file and then close it.
Now we will run the NGINX start and stop commands.
How To Configure NGINX and ModSecurity?
We will configure NGINX first. To do this we open the
file
In this file we find the following part:
and we replace these codes with the following codes:
and we save and exit.
Now it has come to enable OWASP rules. For this, we open the
file with the,
command and add this part:
Save and exit..
We will import the required ModSecurity configuration files in the next step.
For this, we run the commands I've written:
We add the OWASP ModSecurity Core Rule set with the following commands and our process ends:
We add the OWASP ModSecurity Core Rule set with the following commands and our process ends:
Before testing ModSecurity, we open our firewall with the commands I gave:
How To Run ModSecurity?
Yes, our process is over and it's time to test if it works.
For this, we type the following command to our server:

Now we open a browser and enter this in the browser:
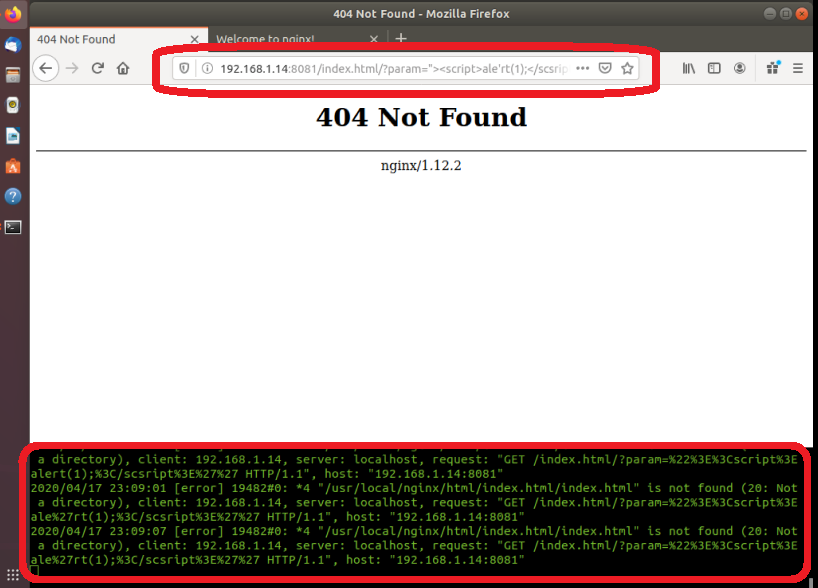
Yes, we managed to get our logs as you can see below. The system is working!
Source: https://www.turkhackteam.org/linux-server-yonetim/1938654-nginx-ile-modsecurity-kurulumu.html
Translator: Dolyetyus
We will install dependencies, but first we need to disable Apache or we will not be able to start NGINX.
Use these commands to disable it.
Kod:
[FONT=Lucida Console][COLOR=White][FONT=Lucida Console][COLOR=Lime]sudo systemctl stop apache2 sudo systemctl disable apache2[/COLOR][/FONT][/COLOR][/FONT]Now we go back to Terminal to install dependencies and run our commands.
Kod:
[FONT=Lucida Console][COLOR=White][FONT=Lucida Console][COLOR=Lime]sudo apt-get install -y git build-essential libpcre3 libpcre3-dev libssl-dev libtool autoconf apache2-dev libxml2-dev libcurl4-openssl-dev automake pkgconf[/COLOR][/FONT][/COLOR][/FONT]How To Install ModSecurity?
Yeah, now it's time to install ModSecurity.
First we need to download the ModSecurity nginx_refactoring branch, for this we need to run the following commands.
Kod:
[FONT=Lucida Console][COLOR=White][FONT=Lucida Console][COLOR=Lime]cd /usr/src git clone -b nginx_refactoring https://github.com/SpiderLabs/ModSecurity.git[/COLOR][/FONT][/COLOR][/FONT]When the download is finished, we will compile with commands.
Kod:
[FONT=Lucida Console][COLOR=White][FONT=Lucida Console][COLOR=Lime]cd ModSecurity ./autogen.sh./configure --enable-standalone-module --disable-mlogcmake[/COLOR][/FONT][/COLOR][/FONT]How To Install Nginx?
Now it's time to download and compile Nginx. The version I will use will be NGINX 1.13.4.
Kod:
[FONT=Lucida Console][COLOR=White][FONT=Lucida Console][COLOR=lime]cd /usr/src sudo wget http://nginx.org/download/nginx-1.13.4.tar.gz[/COLOR][/FONT][/COLOR][/FONT]We extract this file with this command:
Kod:
[FONT=Lucida Console][COLOR=White][FONT=Lucida Console][COLOR=Lime]sudo tar xvzf nginx-1.13.4.tar.gz[/COLOR][/FONT][/COLOR][/FONT]Let's switch to the root user with the sudo -s command before proceeding with the compilation process.
We'll compile these commands after passing:
Kod:
[FONT=Lucida Console][COLOR=White][FONT=Lucida Console][COLOR=lime]cd nginx-1.13.4/ ./configure --user=www-data --group=www-data --add-module=/usr/src/ModSecurity/nginx/modsecurity --with-http_ssl_module
make make install[/COLOR][/FONT][/COLOR][/FONT]Now it's time to change the default nginx user.
Kod:
[FONT=Lucida Console][COLOR=White][FONT=Lucida Console][COLOR=White][COLOR=Lime]sed -i "s/#user nobody;/user www-data www-data;/" /usr/local/nginx/conf/nginx.conf[/COLOR][/COLOR][/FONT][/COLOR][/FONT]We need to use the following command to test the installation.
Kod:
[FONT=Lucida Console][COLOR=White][FONT=Lucida Console][COLOR=lime]/usr/local/nginx/sbin/nginx -t[/COLOR][/FONT][/COLOR][/FONT]Now it's time to run OWASP Rule Configurations and OWASP tests.
Creating A Systemd Volume File
To make sure NGINX can start at boot
Kod:
[FONT=Lucida Console][COLOR=White][FONT=Lucida Console][COLOR=Red]sudo nano /lib/systemd/system/nginx.service[/COLOR][/FONT][/COLOR][/FONT]
Kod:
[FONT=Lucida Console][COLOR=White][FONT=Lucida Console][COLOR=red][Service] Type=forking  ExecStartPre=/usr/local/nginx/sbin/nginx -t -c  /usr/local/nginx/conf/nginx.conf ExecStart=/usr/local/nginx/sbin/nginx  -c /usr/local/nginx/conf/nginx.conf  ExecReload=/usr/local/nginx/sbin/nginx -s reload
KillStop=/usr/local/nginx/sbin/nginx  -s stop KillMode=process Restart=on-failure RestartSec=42s  PrivateTmp=true LimitNOFILE=200000
 [Install]  WantedBy=multi-user.target  Save and close that file. To start, stop,  and restart nginx, the commands will now be: sudo systemctl start  nginx.service sudo systemctl stop nginx.service sudo systemctl restart  nginx.service[/COLOR][/FONT][/COLOR][/FONT]
We save this file and then close it.
Now we will run the NGINX start and stop commands.
How To Configure NGINX and ModSecurity?
We will configure NGINX first. To do this we open the
Kod:
[FONT=Lucida Console][COLOR=White][FONT=Lucida Console][COLOR=Lime]sudo nano /usr/local/nginx/conf/nginx.conf nginx.conf[/COLOR][/FONT][/COLOR][/FONT]In this file we find the following part:
Kod:
[FONT=Lucida Console][COLOR=White][FONT=Lucida Console][COLOR=White][COLOR=Red]******** / {
    root   html;
    index  index.html index.htm;
}[/COLOR][/COLOR][/FONT][/COLOR][/FONT]
and we replace these codes with the following codes:
Kod:
[FONT=Lucida Console][COLOR=White][FONT=Lucida Console][COLOR=Lime]******** / {
    ModSecurityEnabled on;
    ModSecurityConfig modsec_includes.conf;
    root   html;
    index  index.html index.htm;
}[/COLOR][/FONT][/COLOR][/FONT]
and we save and exit.
Now it has come to enable OWASP rules. For this, we open the
Kod:
[FONT=Lucida Console][COLOR=White][FONT=Lucida Console][COLOR=lime]modsec_includes.conf[/COLOR][/FONT][/COLOR][/FONT]file with the,
Kod:
[FONT=Lucida Console][COLOR=White][FONT=Lucida Console][COLOR=White][COLOR=Lime]sudo nano /usr/local/nginx/conf/modsec_includes.conf[/COLOR][/COLOR][/FONT][/COLOR][/FONT]command and add this part:
Kod:
[FONT=Lucida Console][COLOR=White][FONT=Lucida Console][COLOR=White][COLOR=lime]include modsecurity.conf
include owasp-modsecurity-crs/crs-setup.conf
include owasp-modsecurity-crs/rules/*.conf[/COLOR][/COLOR][/FONT][/COLOR][/FONT]
Save and exit..
We will import the required ModSecurity configuration files in the next step.
For this, we run the commands I've written:
Kod:
[FONT=Lucida Console][COLOR=White][FONT=Lucida Console][COLOR=Lime]sudo cp /usr/src/ModSecurity/modsecurity.conf-recommended /usr/local/nginx/conf/modsecurity.conf
sudo cp /usr/src/ModSecurity/unicode.mapping /usr/local/nginx/conf/[/COLOR][/FONT][/COLOR][/FONT]
We add the OWASP ModSecurity Core Rule set with the following commands and our process ends:
Kod:
[FONT=Lucida Console][COLOR=White][FONT=Lucida Console][COLOR=Red]sudo sed -i "s/SecRuleEngine DetectionOnly/SecRuleEngine On/" /usr/local/nginx/conf/modsecurity.conf[/COLOR][/FONT][/COLOR][/FONT]We add the OWASP ModSecurity Core Rule set with the following commands and our process ends:
Kod:
[FONT=Lucida Console][COLOR=White][FONT=Lucida Console][COLOR=White][COLOR=Cyan]cd /usr/local/nginx/conf
sudo git clone https://github.com/SpiderLabs/owasp-modsecurity-crs.git
sudo cd owasp-modsecurity-crs
sudo mv crs-setup.conf.example crs-setup.conf
sudo cd rules
sudo mv REQUEST-900-EXCLUSION-RULES-BEFORE-CRS.conf.example REQUEST-900-EXCLUSION-RULES-BEFORE-CRS.conf
sudo mv RESPONSE-999-EXCLUSION-RULES-AFTER-CRS.conf.example RESPONSE-999-EXCLUSION-RULES-AFTER-CRS.conf[/COLOR][/COLOR][/FONT][/COLOR][/FONT]
Before testing ModSecurity, we open our firewall with the commands I gave:
Kod:
[FONT=Lucida Console][COLOR=White][FONT=Lucida Console][COLOR=red]sudo ufw allow OpenSSH
sudo ufw allow 80
sudo ufw default deny
sudo ufw enable[/COLOR][/FONT][/COLOR][/FONT]
How To Run ModSecurity?
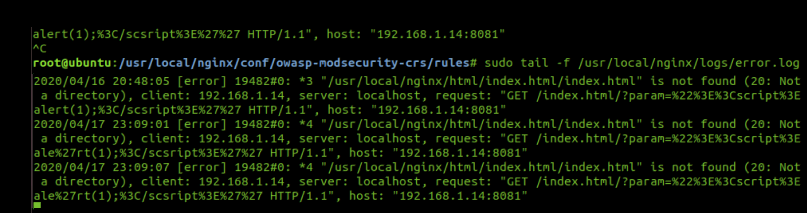
Yes, our process is over and it's time to test if it works.
For this, we type the following command to our server:
Kod:
[FONT=Lucida Console][COLOR=White][FONT=Lucida Console][COLOR=DarkOrange]sudo tail -f /usr/local/nginx/logs/error.log[/COLOR][/FONT][/COLOR][/FONT]Now we open a browser and enter this in the browser:
Kod:
[FONT=Lucida Console][COLOR=White][FONT=Lucida Console][COLOR=darkorange]http://192.168.1.14:8081/index.html/?param=><script>alert(1);</script[/COLOR][/FONT][/COLOR][/FONT]Yes, we managed to get our logs as you can see below. The system is working!
Source: https://www.turkhackteam.org/linux-server-yonetim/1938654-nginx-ile-modsecurity-kurulumu.html
Translator: Dolyetyus
Moderatör tarafında düzenlendi:

