

A while ago I wrote an article about a Modular Architecture in iOS. I had to leave many details out to keep it short and readable. So, Id like to expand a little and write about some details.
Some of the things I will cover in this article:
Types of dependencies.
Sharing fonts among modules and the app.
Sharing images and asset catalogs.
Working with Bundles and Storyboards.
The Boundaries of a module.
Everything will be in the context of an application that is comprised of a set of modules: core (for entities and business logic), networking, and scenes modules (like a login scene and a home scene). Each module can be run in isolation and depends on other modules.
Types of Dependencies.
One type of dependency is pure code, like the code we usually write, or 3rd party services we import, like SDKs. This is the type of dependency were used to dealing with as developers every day.
I will not go over the different forms of dependency injection we can use in Swift. Thats a good topic for another article and there are already many good ones out there. I just want to mention that the approach of Controlling the World by Stephen Celis is the one Im mostly using these days.
I found that it saves a lot of boilerplate code involved in passing around parameters in a complex graph of objects to achieve full dependency injection.
Another type of dependency is assets, like sounds, fonts, and images. Assets can be thought of as a type of dependency because they might live outside of a module or the application in question. And after all, assets can be provided and generated by code. Let me elaborate a bit about this.
Assets as dependencies.
Any application typically works with a set of fonts, icons, and colors that are used on screens. For example, an image like a user icon might be used in a Login Module and needed in a Home Module too. Some assets are used repeatedly in many parts of an application. This is particularly true for fonts.
The challenge lies in how to define the assets so we can use them everywhere.
A naive and simple approach to this would be to replicate the assets in every module that uses them. This solution has all the problems and dangers that come with duplication, like increased bundle size and potential inconsistencies when updating an asset.
A better approach is to define things in a single place so we can use them everywhere. As you will see, sometimes this isnt entirely possible. I found that there are slight differences between dealing with images and fonts.
Fonts.
We need a way to define fonts in a single place and use them in multiple modules, and in the app itself. Also, it would be nice to access them from code and from storyboards.
Accessing fonts by code is pretty straightforward, as long as we reference the correct bundle (see Using The Right Bundle). One option is to define fonts in a Core Module that will be used by every higher-level module and the app itself.
A core module can provide access to the fonts in the form of public Structs that act as UIFont builders. Tools like R.swift and Sourcery can help out achieving this process. You can define a structure that exposes fonts, like this:

Fonts in Code
In order to be able to reference and use fonts defined in an external module, we need to register those fonts so the app can use them. This helper function does that:

Then, to use the fonts, simply call size to obtain the UIFont instance.

Fonts in Storyboards
Using fonts inside storyboards requires that we configure the project and indicate the app which custom fonts it will use. These are the steps to do so:
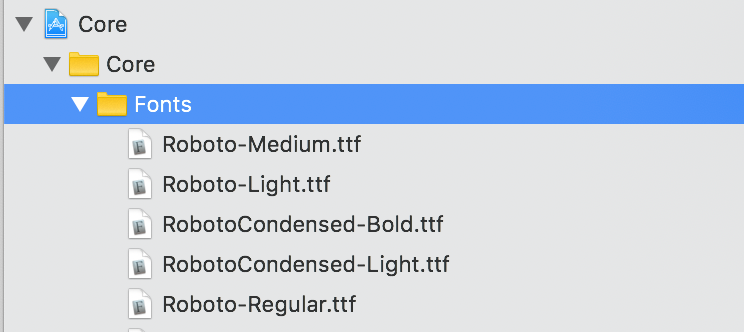
Import the fonts in a module, Core for example. This is the place that will contain all the fonts used in different modules. Make sure the font is part of the target
Configure the app Info.plist so storyboards can see those fonts.

Inside App's Info.plist
<key>UIAppFonts</key>
<array>
<string>Roboto-Black.ttf</string>
<string>Roboto-BlackItalic.ttf</string>
<string>Roboto-Bold.ttf</string>
<string>Roboto-BoldItalic.ttf</string>
...
</array>
Images:
Images are typically shipped as part of Asset Catalogs or inside the modules or apps Bundle. There are differences in the way we can access images that live outside a module: From Storyboards and Code.
From Storyboards.
If we want to reference an image inside a Storyboard, there is no way to specify a framework or bundle that the image might come from. We are limited to assets catalogs declared in the particular Target that the storyboard is shipped in.
This is quite disappointing since it would be ideal to just say, load this image from this asset catalog, contained in this specific framework. This is yet another downside of using storyboards in their current form.
So, the answer is to organize images in Asset Catalogs, having duplicate assets when una****able. Even if we use Shared Asset Catalogs, when the app is built, each catalog is replicated in each modules .framework. It is a nice way to define only once and a**** mistakes though. The obvious downside is that the app size will increase.
''One thing you can do is to have a shared assets catalog and include it in as many modules as you need those assets. Bear in mind the cost of duplication mentioned above.''
From Code.
Accessing images from code is easier because we dont have the restrictions that storyboards impose. We can use an image exposed in a module and well be fine, as long as the module works with the right Bundle to obtain the image.
Using the Right Bundle.
There are a lot of methods that receive a bundle as a parameter with a default value. By default that value is nil, which means that theBundle.main instance will be used. If we are running the app, that bundle will be the app bundle. If we are running a modules test app, that bundle will be the test app bundle.
Examples of this includeUINib(nibName:, bundle") , UIStoryboard(name:, bundle: ), UIImage(named: , bundle: ), DataAsset(name:, bundle: ). etc.
, UIStoryboard(name:, bundle: ), UIImage(named: , bundle: ), DataAsset(name:, bundle: ). etc.
So, it is really important to specify the right bundle. For example, if we want to create a module for a particular scene, that module will most likely include storyboards, images and nib files. If we dont reference the right bundle, there will be runtime errors.
The way to specify the right bundle is to instantiate it using a class that lives in the desired target, like this:

In general, I define a DummyModuleClass that does nothing to test if things are accessible from playgrounds, or in this case, to instantiate the correct Bundle.
Boundaries.
Each module defines its boundaries in terms of what it uses from the outside world and what it exposes to the outside world. Its our responsibility to pass whats necessary to configure a module before using it.
By having a clearly defined boundary, each module can expose a configuration function that needs to be called before using the module. That function can assert that all values are correct and just configure each module
Exposing an interface.
A module should expose a limited set of classes, structs, and protocols. Keeping this at a minimum makes us focus on whats important.
There are different patterns and techniques we can use. A protocol-based approach is one option, like with delegates for example. Another approach could be based on functions and type aliases instead of protocols.
In any case, the module that defines the dependencies it needs is agnostic of the concrete implementations. Referring to protocol instances or functions it can function without caring about the concrete implementations.
Notifications
Some events might need to be exposed to broadcast states of some objects of a module. Exposing an enum of notifications that can be subscribed to, might be a good idea.
Configuring tools
A lot of tools require some Build-Phase scripts to run after or before compiling the source code. Some of the tools I use frequently are SwiftLint, Sourcery, R.swift, Etc.
Its important to specify the right folders for each module. For example, for Sourcery, we might need to use diferent templates, and output different .generated files.
Remember to define (or re-define) the right build phase scripts on the right modules and to use the proper paths and file names.
Finally
Good O.O. design always pays off.
Good O.O. design always pays off.
With this kind of architectures, especially when a project is migrated gradually towards it, the benefits of a good OO design are palpable. Taking a module from a monolithic design into a modular one can be really painful. But if we did our work properly and created loosely coupled abstractions, its less likely that the process is a pain.
Encapsulated functionality in a clear space.
By defining a clear boundary, we need to specify all the functions that a module will use from outside. This lets us write and see in a single space all the functionality that a module invokes. The consequence of this is a pretty clear picture of how a module is configured.
Source:https://medium.com/flawless-app-stories/modular-architecture-in-ios-dependencies-1cf9b563aa1d
Thekoftte
Some of the things I will cover in this article:
Types of dependencies.
Sharing fonts among modules and the app.
Sharing images and asset catalogs.
Working with Bundles and Storyboards.
The Boundaries of a module.
Everything will be in the context of an application that is comprised of a set of modules: core (for entities and business logic), networking, and scenes modules (like a login scene and a home scene). Each module can be run in isolation and depends on other modules.
Types of Dependencies.
One type of dependency is pure code, like the code we usually write, or 3rd party services we import, like SDKs. This is the type of dependency were used to dealing with as developers every day.
I will not go over the different forms of dependency injection we can use in Swift. Thats a good topic for another article and there are already many good ones out there. I just want to mention that the approach of Controlling the World by Stephen Celis is the one Im mostly using these days.
I found that it saves a lot of boilerplate code involved in passing around parameters in a complex graph of objects to achieve full dependency injection.
Another type of dependency is assets, like sounds, fonts, and images. Assets can be thought of as a type of dependency because they might live outside of a module or the application in question. And after all, assets can be provided and generated by code. Let me elaborate a bit about this.
Assets as dependencies.
Any application typically works with a set of fonts, icons, and colors that are used on screens. For example, an image like a user icon might be used in a Login Module and needed in a Home Module too. Some assets are used repeatedly in many parts of an application. This is particularly true for fonts.
The challenge lies in how to define the assets so we can use them everywhere.
A naive and simple approach to this would be to replicate the assets in every module that uses them. This solution has all the problems and dangers that come with duplication, like increased bundle size and potential inconsistencies when updating an asset.
A better approach is to define things in a single place so we can use them everywhere. As you will see, sometimes this isnt entirely possible. I found that there are slight differences between dealing with images and fonts.
Fonts.
We need a way to define fonts in a single place and use them in multiple modules, and in the app itself. Also, it would be nice to access them from code and from storyboards.
Accessing fonts by code is pretty straightforward, as long as we reference the correct bundle (see Using The Right Bundle). One option is to define fonts in a Core Module that will be used by every higher-level module and the app itself.
A core module can provide access to the fonts in the form of public Structs that act as UIFont builders. Tools like R.swift and Sourcery can help out achieving this process. You can define a structure that exposes fonts, like this:
Fonts in Code
In order to be able to reference and use fonts defined in an external module, we need to register those fonts so the app can use them. This helper function does that:
Then, to use the fonts, simply call size to obtain the UIFont instance.
Fonts in Storyboards
Using fonts inside storyboards requires that we configure the project and indicate the app which custom fonts it will use. These are the steps to do so:
Import the fonts in a module, Core for example. This is the place that will contain all the fonts used in different modules. Make sure the font is part of the target
Configure the app Info.plist so storyboards can see those fonts.
Inside App's Info.plist
<key>UIAppFonts</key>
<array>
<string>Roboto-Black.ttf</string>
<string>Roboto-BlackItalic.ttf</string>
<string>Roboto-Bold.ttf</string>
<string>Roboto-BoldItalic.ttf</string>
...
</array>
Images:
Images are typically shipped as part of Asset Catalogs or inside the modules or apps Bundle. There are differences in the way we can access images that live outside a module: From Storyboards and Code.
From Storyboards.
If we want to reference an image inside a Storyboard, there is no way to specify a framework or bundle that the image might come from. We are limited to assets catalogs declared in the particular Target that the storyboard is shipped in.
This is quite disappointing since it would be ideal to just say, load this image from this asset catalog, contained in this specific framework. This is yet another downside of using storyboards in their current form.
So, the answer is to organize images in Asset Catalogs, having duplicate assets when una****able. Even if we use Shared Asset Catalogs, when the app is built, each catalog is replicated in each modules .framework. It is a nice way to define only once and a**** mistakes though. The obvious downside is that the app size will increase.
''One thing you can do is to have a shared assets catalog and include it in as many modules as you need those assets. Bear in mind the cost of duplication mentioned above.''
From Code.
Accessing images from code is easier because we dont have the restrictions that storyboards impose. We can use an image exposed in a module and well be fine, as long as the module works with the right Bundle to obtain the image.
Using the Right Bundle.
There are a lot of methods that receive a bundle as a parameter with a default value. By default that value is nil, which means that theBundle.main instance will be used. If we are running the app, that bundle will be the app bundle. If we are running a modules test app, that bundle will be the test app bundle.
Examples of this includeUINib(nibName:, bundle
, UIStoryboard(name:, bundle: ), UIImage(named: , bundle: ), DataAsset(name:, bundle: ). etc.So, it is really important to specify the right bundle. For example, if we want to create a module for a particular scene, that module will most likely include storyboards, images and nib files. If we dont reference the right bundle, there will be runtime errors.
The way to specify the right bundle is to instantiate it using a class that lives in the desired target, like this:
In general, I define a DummyModuleClass that does nothing to test if things are accessible from playgrounds, or in this case, to instantiate the correct Bundle.
Boundaries.
Each module defines its boundaries in terms of what it uses from the outside world and what it exposes to the outside world. Its our responsibility to pass whats necessary to configure a module before using it.
By having a clearly defined boundary, each module can expose a configuration function that needs to be called before using the module. That function can assert that all values are correct and just configure each module
Exposing an interface.
A module should expose a limited set of classes, structs, and protocols. Keeping this at a minimum makes us focus on whats important.
There are different patterns and techniques we can use. A protocol-based approach is one option, like with delegates for example. Another approach could be based on functions and type aliases instead of protocols.
In any case, the module that defines the dependencies it needs is agnostic of the concrete implementations. Referring to protocol instances or functions it can function without caring about the concrete implementations.
Notifications
Some events might need to be exposed to broadcast states of some objects of a module. Exposing an enum of notifications that can be subscribed to, might be a good idea.
Configuring tools
A lot of tools require some Build-Phase scripts to run after or before compiling the source code. Some of the tools I use frequently are SwiftLint, Sourcery, R.swift, Etc.
Its important to specify the right folders for each module. For example, for Sourcery, we might need to use diferent templates, and output different .generated files.
Remember to define (or re-define) the right build phase scripts on the right modules and to use the proper paths and file names.
Finally
Good O.O. design always pays off.
Good O.O. design always pays off.
With this kind of architectures, especially when a project is migrated gradually towards it, the benefits of a good OO design are palpable. Taking a module from a monolithic design into a modular one can be really painful. But if we did our work properly and created loosely coupled abstractions, its less likely that the process is a pain.
Encapsulated functionality in a clear space.
By defining a clear boundary, we need to specify all the functions that a module will use from outside. This lets us write and see in a single space all the functionality that a module invokes. The consequence of this is a pretty clear picture of how a module is configured.
Source:https://medium.com/flawless-app-stories/modular-architecture-in-ios-dependencies-1cf9b563aa1d
Thekoftte

