

Greetings Dear Turk Hack Team Members, in this tutorial you'll continue to learn python socket module.
Viewing Socket State
To see the current state of sockets on your host, use netstat. Its available by default on macOS, Linux, and Windows.
Heres the netstat output from macOS after starting the server:
Notice that Local Address is 127.0.0.1.65432. If echo-server.py had used HOST = '' instead of HOST = '127.0.0.1', netstat would show this:
Local Address is *.65432, which means all available host interfaces that support the address family will be used to accept incoming connections. In this example, in the call to socket(), socket.AF_INET was used (IPv4). You can see this in the Proto column: tcp4.
Ive trimmed the output above to show the echo server only. Youll likely see much more output, depending on the system youre running it on. The things to notice are the columns Proto, Local Address, and (state). In the last example above, netstat shows the echo server is using an IPv4 TCP socket (tcp4), on port 65432 on all interfaces (*.65432), and its in the listening state (LISTEN).
Another way to see this, along with additional helpful information, is to use lsof (list open files). Its available by default on macOS and can be installed on Linux using your package manager, if its not already:
lsof gives you the COMMAND, PID (process id), and USER (user id) of open Internet sockets when used with the -i option. Above is the echo server process.
netstat and lsof have a lot of options available and differ depending on the OS youre running them on. Check the man page or documéntation for both. Theyre definitely worth spending a little time with and getting to know. Youll be rewarded. On macOS and Linux, use man netstat and man lsof. For Windows, use netstat /?.
Heres a common error youll see when a connection attempt is made to a port with no listening socket:
Either the specified port number is wrong or the server isnt running. Or maybe theres a firewall in the path thats blocking the connection, which can be easy to forget about. You may also see the error Connection timed out. Get a firewall rule added that allows the client to connect to the TCP port!
Communication Breakdown
Lets take a closer look at how the client and server communicated with each other:
When using the loopback interface (IPv4 address 127.0.0.1 or IPv6 address ::1), data never leaves the host or touches the external network. In the diagram above, the loopback interface is contained inside the host. This represents the internal nature of the loopback interface and that connections and data that transit it are local to the host. This is why youll also hear the loopback interface and IP address 127.0.0.1 or ::1 referred to as localhost.
Applications use the loopback interface to communicate with other processes running on the host and for security and isolation from the external network. Since its internal and accessible only from within the host, its not exposed.
You can see this in action if you have an application server that uses its own private database. If its not a database used by other servers, its probably configured to listen for connections on the loopback interface only. If this is the case, other hosts on the network cant connect to it.
When you use an IP address other than 127.0.0.1 or ::1 in your applications, its probably bound to an Ethernet interface thats connected to an external network. This is your gateway to other hosts outside of your localhost kingdom:
Be careful out there. Its a nasty, cruel world. Be sure to read the section Using Hostnames before venturing from the safe confines of localhost. Theres a security note that applies even if youre not using hostnames and using IP addresses only.
Handling Multiple Connections
The echo server definitely has its limitations. The biggest being that it serves only one client and then exits. The echo client has this limitation too, but theres an additional problem. When the client makes the following call, its possible that s.recv() will return only one byte, b'H' from b'Hello, world':
The bufsize argument of 1024 used above is the maximum amount of data to be received at once. It doesnt mean that recv() will return 1024 bytes.
send() also behaves this way. send() returns the number of bytes sent, which may be less than the size of the data passed in. Youre responsible for checking this and calling send() as many times as needed to send all of the data:
We avoıded having to do this by using sendall():
We have two problems at this point:
How do we handle multiple connections concurrently?
We need to call send() and recv() until all data is sent or received.
What do we do? There are many approaches to concurrency. More recently, a popular approach is to use Asynchronous I/O. asyncio was introduced into the standard library in Python 3.4. The traditional choice is to use threads.
The trouble with concurrency is its hard to get right. There are many subtleties to consider and guard against. All it takes is for one of these to manifest itself and your application may suddenly fail in not-so-subtle ways.
I dont say this to scare you away from learning and using concurrent programming. If your application needs to scale, its a necessity if you want to use more than one processor or one core. However, for this tutorial, well use something thats more traditional than threads and easier to reason about. Were going to use the granddaddy of system calls: select().
select() allows you to check for I/O completion on more than one socket. So you can call select() to see which sockets have I/O ready for reading and/or writing. But this is Python, so theres more. Were going to use the selectors module in the standard library so the most efficient implementation is used, regardless of the operating system we happen to be running on:
Even though, by using select(), were not able to run concurrently, depending on your workload, this approach may still be plenty fast. It depends on what your application needs to do when it services a request and the number of clients it needs to support.
asyncio uses single-threaded cooperative multitasking and an event loop to manage tasks. With select(), well be writing our own version of an event loop, albeit more simply and synchronously. When using multiple threads, even though you have concurrency, we currently have to use the GIL with CPython and PyPy. This effectively limits the amount of work we can do in parallel anyway.
I say all of this to explain that using select() may be a perfectly fine choice. Dont feel like you have to use asyncio, threads, or the latest asynchronous library. Typically, in a network application, your application is I/O bound: it could be waiting on the local network, endpoints on the other side of the network, on a disk, and so forth.
If youre getting requests from clients that initiate CPU bound work, look at the concurrent.futures module. It contains the class ProcessPoolExecutor that uses a pool of processes to execute calls asynchronously.
If you use multiple processes, the operating system is able to schedule your Python code to run in parallel on multiple processors or cores, without the GIL. For ideas and inspiration, see the PyCon talk John Reese - Thinking Outside the GIL with AsyncIO and Multiprocessing - PyCon 2018.
In the next section, well look at examples of a server and client that address these problems. They use select() to handle multiple connections simultaneously and call send() and recv() as many times as needed.
Multi-Connection Client and Server
In the next two sections, well create a server and client that handles multiple connections using a selector object created from the selectors module.
Multi-Connection Server
First, lets look at the multi-connection server, multiconn-server.py. Heres the first part that sets up the listening socket:
The biggest difference between this server and the echo server is the call to lsock.setblocking(False) to configure the socket in non-blocking mode. Calls made to this socket will no longer block. When its used with sel.select(), as youll see below, we can wait for events on one or more sockets and then read and write data when its ready.
sel.register() registers the socket to be monitored with sel.select() for the events youre interested in. For the listening socket, we want read events: selectors.EVENT_READ.
data is used to store whatever arbitrary data youd like along with the socket. Its returned when select() returns. Well use data to keep track of whats been sent and received on the socket.
Next is the event loop:
sel.select(timeout=None) blocks until there are sockets ready for I/O. It returns a list of (key, events) tuples, one for each socket. key is a SelectorKey namedtuple that contains a fileobj attribute. key.fileobj is the socket object, and mask is an event mask of the operations that are ready.
If key.data is None, then we know its from the listening socket and we need to accept() the connection. Well call our own accept() wrapper function to get the new socket object and register it with the selector. Well look at it in a moment.
If key.data is not None, then we know its a client socket thats already been accepted, and we need to service it. service_connection() is then called and passed key and mask, which contains everything we need to operate on the socket.
Lets look at what our accept_wrapper() function does:
Since the listening socket was registered for the event selectors.EVENT_READ, it should be ready to read. We call sock.accept() and then immediately call conn.setblocking(False) to put the socket in non-blocking mode.
Remember, this is the main objective in this version of the server since we dont want it to block. If it blocks, then the entire server is stalled until it returns. Which means other sockets are left waiting. This is the dreaded hang state that you dont want your server to be in.
Next, we create an object to hold the data we want included along with the socket using the class types.SimpleNamespace. Since we want to know when the client connection is ready for reading and writing, both of those events are set using the following:
The events mask, socket, and data objects are then passed to sel.register().
Now lets look at service_connection() to see how a client connection is handled when its ready:
This is the heart of the simple multi-connection server. key is the namedtuple returned from select() that contains the socket object (fileobj) and data object. mask contains the events that are ready.
If the socket is ready for reading, then mask & selectors.EVENT_READ is true, and sock.recv() is called. Any data thats read is appended to data.outb so it can be sent later.
Note the else: block if no data is received:
This means that the client has closed their socket, so the server should too. But dont forget to first call sel.unregister() so its no longer monitored by select().
When the socket is ready for writing, which should always be the case for a healthy socket, any received data stored in data.outb is echoed to the client using sock.send(). The bytes sent are then removed from the send buffer:
More parts are coming soon as well //Quoted
Viewing Socket State
To see the current state of sockets on your host, use netstat. Its available by default on macOS, Linux, and Windows.
Heres the netstat output from macOS after starting the server:
Kod:
[COLOR="PaleGreen"]$ netstat -an
Active Internet connections (including servers)
Proto Recv-Q Send-Q  Local Address          Foreign Address        (state)
tcp4       0      0  127.0.0.1.65432        *.*                    LISTEN[/COLOR]
Notice that Local Address is 127.0.0.1.65432. If echo-server.py had used HOST = '' instead of HOST = '127.0.0.1', netstat would show this:
Kod:
[COLOR="palegreen"]$ netstat -an
Active Internet connections (including servers)
Proto Recv-Q Send-Q  Local Address          Foreign Address        (state)
tcp4       0      0  *.65432                *.*                    LISTEN[/COLOR]
Local Address is *.65432, which means all available host interfaces that support the address family will be used to accept incoming connections. In this example, in the call to socket(), socket.AF_INET was used (IPv4). You can see this in the Proto column: tcp4.
Ive trimmed the output above to show the echo server only. Youll likely see much more output, depending on the system youre running it on. The things to notice are the columns Proto, Local Address, and (state). In the last example above, netstat shows the echo server is using an IPv4 TCP socket (tcp4), on port 65432 on all interfaces (*.65432), and its in the listening state (LISTEN).
Another way to see this, along with additional helpful information, is to use lsof (list open files). Its available by default on macOS and can be installed on Linux using your package manager, if its not already:
Kod:
[COLOR="palegreen"]$ lsof -i -n
COMMAND     PID   USER   FD   TYPE   DEVICE SIZE/OFF NODE NAME
Python    67982 nathan    3u  IPv4 0xecf272      0t0  TCP *:65432 (LISTEN)[/COLOR]
lsof gives you the COMMAND, PID (process id), and USER (user id) of open Internet sockets when used with the -i option. Above is the echo server process.
netstat and lsof have a lot of options available and differ depending on the OS youre running them on. Check the man page or documéntation for both. Theyre definitely worth spending a little time with and getting to know. Youll be rewarded. On macOS and Linux, use man netstat and man lsof. For Windows, use netstat /?.
Heres a common error youll see when a connection attempt is made to a port with no listening socket:
Kod:
[COLOR="palegreen"]$ ./echo-client.py
Traceback (most recent call last):
  File "./echo-client.py", line 9, in <module>
    s.connect((HOST, PORT))
ConnectionRefusedError: [Errno 61] Connection refused[/COLOR]
Either the specified port number is wrong or the server isnt running. Or maybe theres a firewall in the path thats blocking the connection, which can be easy to forget about. You may also see the error Connection timed out. Get a firewall rule added that allows the client to connect to the TCP port!
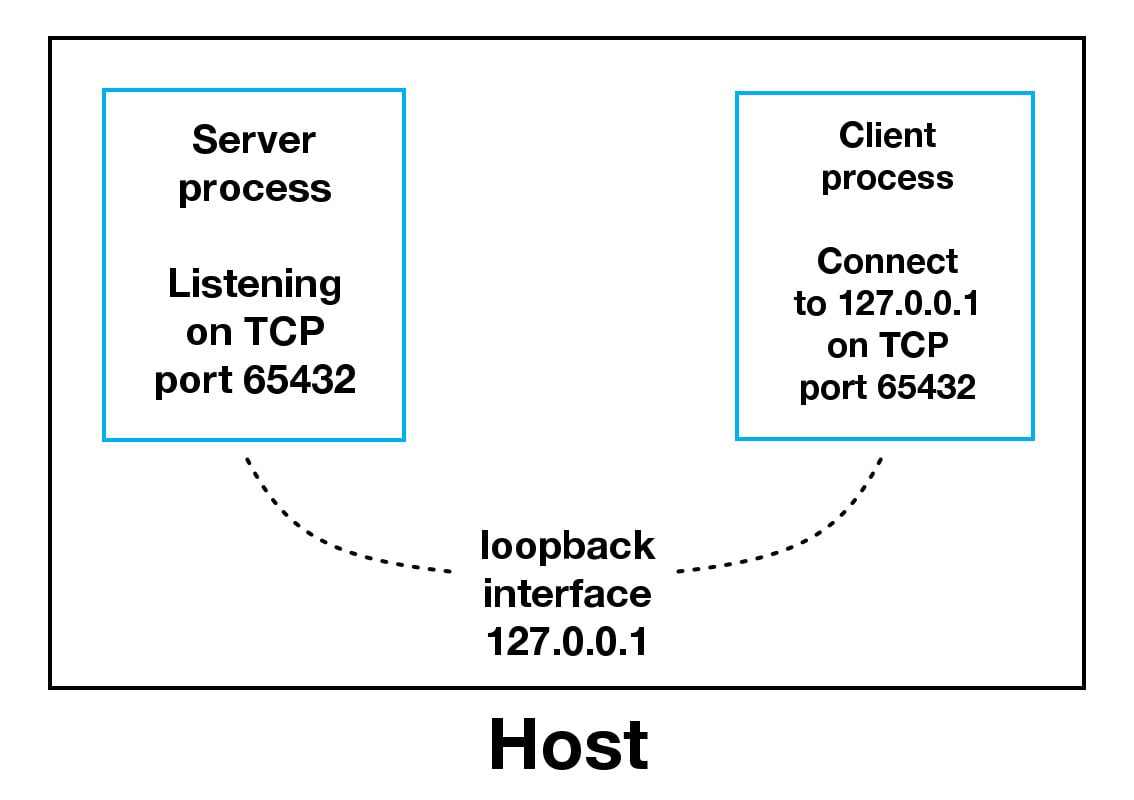
Communication Breakdown
Lets take a closer look at how the client and server communicated with each other:
When using the loopback interface (IPv4 address 127.0.0.1 or IPv6 address ::1), data never leaves the host or touches the external network. In the diagram above, the loopback interface is contained inside the host. This represents the internal nature of the loopback interface and that connections and data that transit it are local to the host. This is why youll also hear the loopback interface and IP address 127.0.0.1 or ::1 referred to as localhost.
Applications use the loopback interface to communicate with other processes running on the host and for security and isolation from the external network. Since its internal and accessible only from within the host, its not exposed.
You can see this in action if you have an application server that uses its own private database. If its not a database used by other servers, its probably configured to listen for connections on the loopback interface only. If this is the case, other hosts on the network cant connect to it.
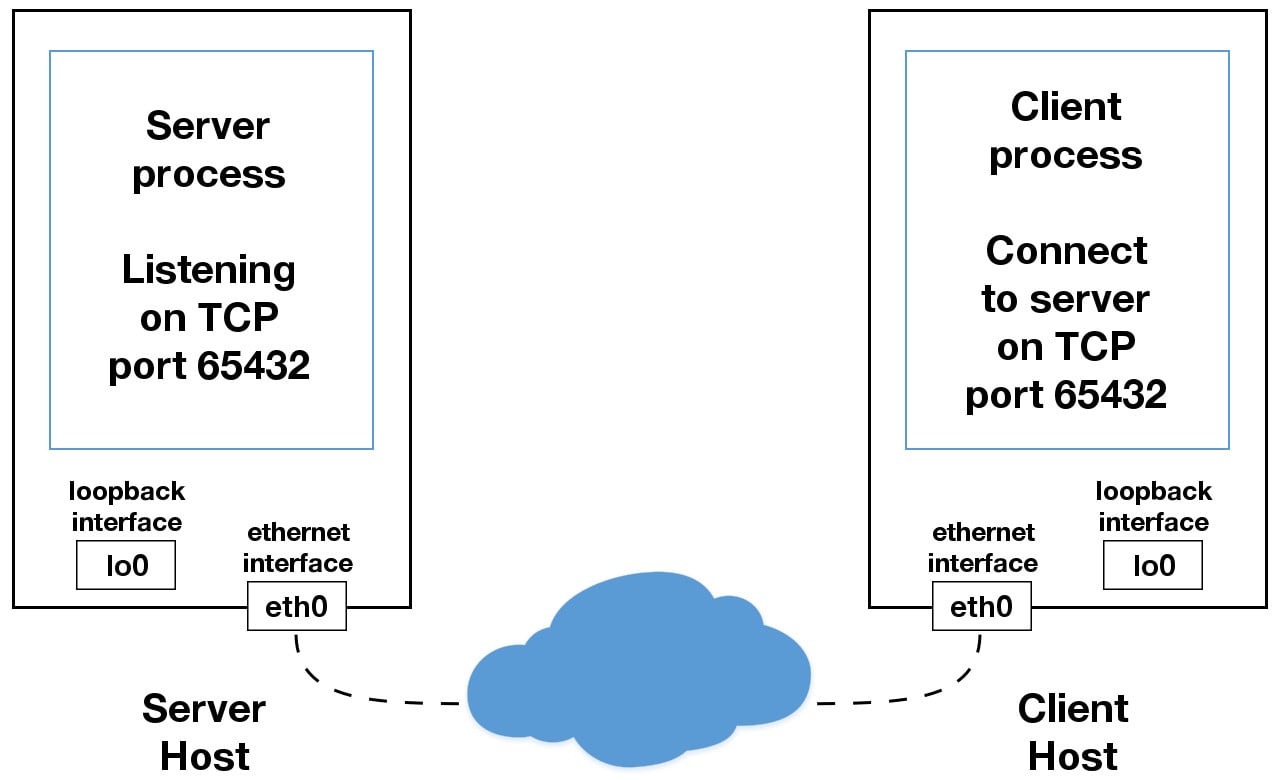
When you use an IP address other than 127.0.0.1 or ::1 in your applications, its probably bound to an Ethernet interface thats connected to an external network. This is your gateway to other hosts outside of your localhost kingdom:
Be careful out there. Its a nasty, cruel world. Be sure to read the section Using Hostnames before venturing from the safe confines of localhost. Theres a security note that applies even if youre not using hostnames and using IP addresses only.
Handling Multiple Connections
The echo server definitely has its limitations. The biggest being that it serves only one client and then exits. The echo client has this limitation too, but theres an additional problem. When the client makes the following call, its possible that s.recv() will return only one byte, b'H' from b'Hello, world':
Kod:
[COLOR="PaleGreen"]data = s.recv(1024)[/COLOR]The bufsize argument of 1024 used above is the maximum amount of data to be received at once. It doesnt mean that recv() will return 1024 bytes.
send() also behaves this way. send() returns the number of bytes sent, which may be less than the size of the data passed in. Youre responsible for checking this and calling send() as many times as needed to send all of the data:
Applications are responsible for checking that all data has been sent; if only some of the data was transmitted, the application needs to attempt delivery of the remaining data.
We avoıded having to do this by using sendall():
Unlike send(), this method continues to send data from bytes until either all data has been sent or an error occurs. None is returned on success.
We have two problems at this point:
How do we handle multiple connections concurrently?
We need to call send() and recv() until all data is sent or received.
What do we do? There are many approaches to concurrency. More recently, a popular approach is to use Asynchronous I/O. asyncio was introduced into the standard library in Python 3.4. The traditional choice is to use threads.
The trouble with concurrency is its hard to get right. There are many subtleties to consider and guard against. All it takes is for one of these to manifest itself and your application may suddenly fail in not-so-subtle ways.
I dont say this to scare you away from learning and using concurrent programming. If your application needs to scale, its a necessity if you want to use more than one processor or one core. However, for this tutorial, well use something thats more traditional than threads and easier to reason about. Were going to use the granddaddy of system calls: select().
select() allows you to check for I/O completion on more than one socket. So you can call select() to see which sockets have I/O ready for reading and/or writing. But this is Python, so theres more. Were going to use the selectors module in the standard library so the most efficient implementation is used, regardless of the operating system we happen to be running on:
This module allows high-level and efficient I/O multiplexing, built upon the select module primitives. Users are encouraged to use this module instead, unless they want precise control over the OS-level primitives used.
Even though, by using select(), were not able to run concurrently, depending on your workload, this approach may still be plenty fast. It depends on what your application needs to do when it services a request and the number of clients it needs to support.
asyncio uses single-threaded cooperative multitasking and an event loop to manage tasks. With select(), well be writing our own version of an event loop, albeit more simply and synchronously. When using multiple threads, even though you have concurrency, we currently have to use the GIL with CPython and PyPy. This effectively limits the amount of work we can do in parallel anyway.
I say all of this to explain that using select() may be a perfectly fine choice. Dont feel like you have to use asyncio, threads, or the latest asynchronous library. Typically, in a network application, your application is I/O bound: it could be waiting on the local network, endpoints on the other side of the network, on a disk, and so forth.
If youre getting requests from clients that initiate CPU bound work, look at the concurrent.futures module. It contains the class ProcessPoolExecutor that uses a pool of processes to execute calls asynchronously.
If you use multiple processes, the operating system is able to schedule your Python code to run in parallel on multiple processors or cores, without the GIL. For ideas and inspiration, see the PyCon talk John Reese - Thinking Outside the GIL with AsyncIO and Multiprocessing - PyCon 2018.
In the next section, well look at examples of a server and client that address these problems. They use select() to handle multiple connections simultaneously and call send() and recv() as many times as needed.
Multi-Connection Client and Server
In the next two sections, well create a server and client that handles multiple connections using a selector object created from the selectors module.
Multi-Connection Server
First, lets look at the multi-connection server, multiconn-server.py. Heres the first part that sets up the listening socket:
Kod:
import selectors
sel = selectors.DefaultSelector()
# ...
lsock = socket.socket(socket.AF_INET, socket.SOCK_STREAM)
lsock.bind((host, port))
lsock.listen()
print('listening on', (host, port))
lsock.setblocking(False)
sel.register(lsock, selectors.EVENT_READ, data=None)
The biggest difference between this server and the echo server is the call to lsock.setblocking(False) to configure the socket in non-blocking mode. Calls made to this socket will no longer block. When its used with sel.select(), as youll see below, we can wait for events on one or more sockets and then read and write data when its ready.
sel.register() registers the socket to be monitored with sel.select() for the events youre interested in. For the listening socket, we want read events: selectors.EVENT_READ.
data is used to store whatever arbitrary data youd like along with the socket. Its returned when select() returns. Well use data to keep track of whats been sent and received on the socket.
Next is the event loop:
Kod:
[COLOR="palegreen"]import selectors
sel = selectors.DefaultSelector()

# ...

while True:
    events = sel.select(timeout=None)
    for key, mask in events:
        if key.data is None:
            accept_wrapper(key.fileobj)
        else:
            service_connection(key, mask)[/COLOR]
sel.select(timeout=None) blocks until there are sockets ready for I/O. It returns a list of (key, events) tuples, one for each socket. key is a SelectorKey namedtuple that contains a fileobj attribute. key.fileobj is the socket object, and mask is an event mask of the operations that are ready.
If key.data is None, then we know its from the listening socket and we need to accept() the connection. Well call our own accept() wrapper function to get the new socket object and register it with the selector. Well look at it in a moment.
If key.data is not None, then we know its a client socket thats already been accepted, and we need to service it. service_connection() is then called and passed key and mask, which contains everything we need to operate on the socket.
Lets look at what our accept_wrapper() function does:
Kod:
[COLOR="palegreen"]def accept_wrapper(sock):
    conn, addr = sock.accept()  # Should be ready to read
    print('accepted connection from', addr)
    conn.setblocking(False)
    data = types.SimpleNamespace(addr=addr, inb=b'', outb=b'')
    events = selectors.EVENT_READ | selectors.EVENT_WRITE
    sel.register(conn, events, data=data9[/COLOR]
Since the listening socket was registered for the event selectors.EVENT_READ, it should be ready to read. We call sock.accept() and then immediately call conn.setblocking(False) to put the socket in non-blocking mode.
Remember, this is the main objective in this version of the server since we dont want it to block. If it blocks, then the entire server is stalled until it returns. Which means other sockets are left waiting. This is the dreaded hang state that you dont want your server to be in.
Next, we create an object to hold the data we want included along with the socket using the class types.SimpleNamespace. Since we want to know when the client connection is ready for reading and writing, both of those events are set using the following:
Kod:
[COLOR="palegreen"]events = selectors.EVENT_READ | selectors.EVENT_WRITE[/COLOR]The events mask, socket, and data objects are then passed to sel.register().
Now lets look at service_connection() to see how a client connection is handled when its ready:
Kod:
[COLOR="palegreen"]def service_connection(key, mask):
    sock = key.fileobj
    data = key.data
    if mask & selectors.EVENT_READ:
        recv_data = sock.recv(1024)  # Should be ready to read
        if recv_data:
            data.outb += recv_data
        else:
            print('closing connection to', data.addr)
            sel.unregister(sock)
            sock.close()
    if mask & selectors.EVENT_WRITE:
        if data.outb:
            print('echoing', repr(data.outb), 'to', data.addr)
            sent = sock.send(data.outb)  # Should be ready to write
            data.outb = data.outb[sent:][/COLOR]
This is the heart of the simple multi-connection server. key is the namedtuple returned from select() that contains the socket object (fileobj) and data object. mask contains the events that are ready.
If the socket is ready for reading, then mask & selectors.EVENT_READ is true, and sock.recv() is called. Any data thats read is appended to data.outb so it can be sent later.
Note the else: block if no data is received:
Kod:
[COLOR="palegreen"]if recv_data:
    data.outb += recv_data
else:
    print('closing connection to', data.addr)
    sel.unregister(sock)
    sock.close()[/COLOR]
This means that the client has closed their socket, so the server should too. But dont forget to first call sel.unregister() so its no longer monitored by select().
When the socket is ready for writing, which should always be the case for a healthy socket, any received data stored in data.outb is echoed to the client using sock.send(). The bytes sent are then removed from the send buffer:
Kod:
[COLOR="palegreen"]data.outb = data.outb[sent:][/COLOR]More parts are coming soon as well //Quoted

